


Tone encoder
#tone encoder
#twin-T circuit
#resistors
#frequency setting
#output tones
#pushbutton
#audio signal
#sound generation

Description: A basic twin-T circuit uses resistors to accurately set the frequency of the output tones, selected by pushbuttons. Momentary switches generate a tone only when the button is pressed.
The twin-T oscillator circuit is a well-known electronic configuration used for generating audio tones and frequencies. It typically consists of two resistors and two capacitors configured in a specific manner to create a notch filter that defines the frequency of oscillation. The output frequency is determined by the resistor and capacitor values, allowing for precise tuning of the desired tone.
In this circuit, the pushbuttons serve as momentary switches that activate the oscillator when pressed. Upon pressing a button, the circuit completes and the twin-T oscillator begins to produce a tone at the set frequency. Once the button is released, the circuit is interrupted, ceasing the tone generation. This functionality is ideal for applications such as sound effects in musical instruments or alert systems.
To implement this circuit, the resistors are typically connected in parallel with the capacitors, forming a feedback loop that sustains oscillation. The values of these components must be chosen carefully to achieve the desired frequency range. For example, using higher resistor values and lower capacitor values will result in higher frequencies, while lower resistor values and higher capacitor values will yield lower frequencies.
The output of the twin-T circuit can be connected to a speaker or an audio output device to produce audible tones. Additional components, such as amplifiers, may be incorporated to enhance the output signal for better sound quality. This circuit configuration allows for versatility in tone generation, making it suitable for various electronic projects and applications.A basic twin-T circuit uses resistors for accurately setting the frequency of the output tones, selected by pushbutton Momentary switches produce a tone only when the button is depressed.
The twin-T oscillator circuit is a well-known electronic configuration used for generating audio tones and frequencies. It typically consists of two resistors and two capacitors configured in a specific manner to create a notch filter that defines the frequency of oscillation. The output frequency is determined by the resistor and capacitor values, allowing for precise tuning of the desired tone.
In this circuit, the pushbuttons serve as momentary switches that activate the oscillator when pressed. Upon pressing a button, the circuit completes and the twin-T oscillator begins to produce a tone at the set frequency. Once the button is released, the circuit is interrupted, ceasing the tone generation. This functionality is ideal for applications such as sound effects in musical instruments or alert systems.
To implement this circuit, the resistors are typically connected in parallel with the capacitors, forming a feedback loop that sustains oscillation. The values of these components must be chosen carefully to achieve the desired frequency range. For example, using higher resistor values and lower capacitor values will result in higher frequencies, while lower resistor values and higher capacitor values will yield lower frequencies.
The output of the twin-T circuit can be connected to a speaker or an audio output device to produce audible tones. Additional components, such as amplifiers, may be incorporated to enhance the output signal for better sound quality. This circuit configuration allows for versatility in tone generation, making it suitable for various electronic projects and applications.A basic twin-T circuit uses resistors for accurately setting the frequency of the output tones, selected by pushbutton Momentary switches produce a tone only when the button is depressed.
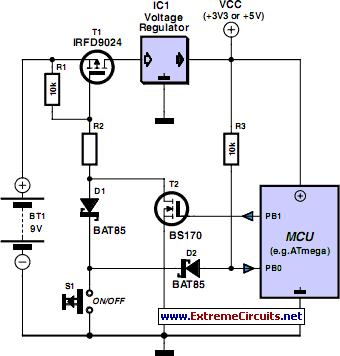
The Gentle Touch
Modern consumer appliances often lack a traditional mains switch. Instead, they are activated and deactivated via a button on a remote control, similar to other functions. This circuit illustrates how a device can be toggled on and off using a...
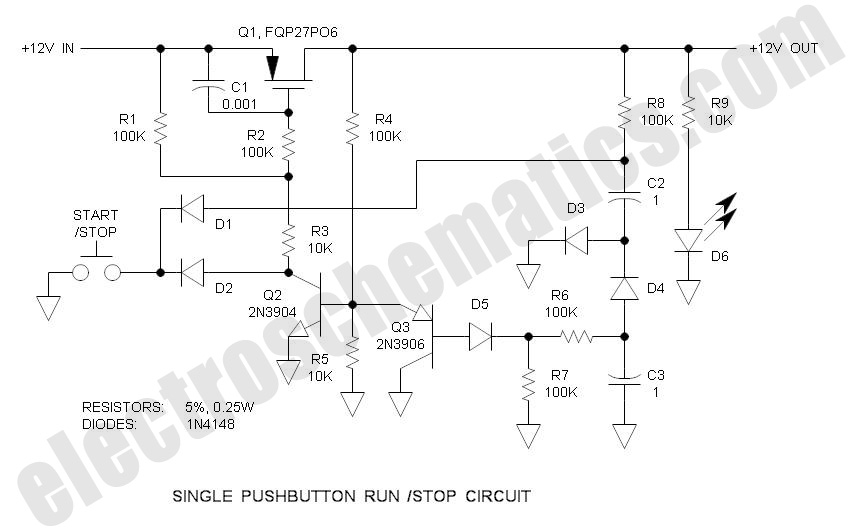
Single Pushbutton Run-Stop Circuit
There are solutions to this problem—mechanical (push On/push Off switch), electromagnetic (latching relay), and electronic (CMOS logic), but few (if any) go...
In addressing the problem of circuit control, several methods are available, including mechanical, electromagnetic, and electronic solutions. Mechanical solutions...

Circuits
To prevent soldering errors, students were instructed to place all their resistors on the board first. Once their placements were verified, they could proceed with soldering. Capacitors were next, followed by LEDs and other components. The middle school class demonstrated...

audio Smallest circuit to make a sound
Any ideas? Is this circuit going to be standalone? Is there any other circuitry around it, perhaps a microcontroller? What circuitry does the timing device contain, or does it even contain electronics? Abdullah Kahraman Mar 22, '13 at 18:10. Since...
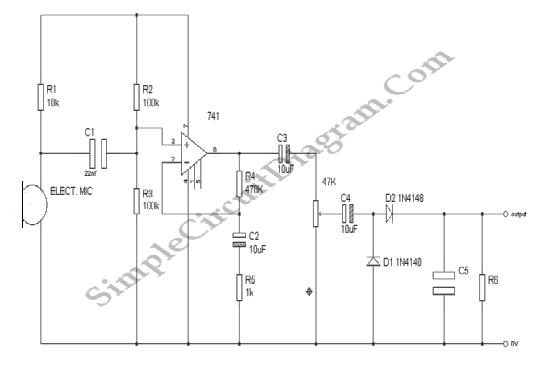
Audio Signal Strength Detector/Converter
Below is the schematic diagram of an audio input module. This module is capable of producing a DC output voltage that is proportional to the amplitude of the input signal.
The audio input module typically consists of several key components that...

Low energy consumption audio signal generator
On occasions when it is necessary to determine if an amplifier is functioning, the most effective tool is an acoustic signal source with a frequency around 1 kHz. The specifications can be considered flexible, as rapid tests typically do not...

DC biasing audio signal
The audio source will be a line-level audio signal ranging from -2V to +2V AC, which will be passed through a 220µF coupling capacitor followed by a two-pole low-pass filter (RC). The signal will be processed by an Analog-to-Digital Converter...

The Gentle Touch
Modern consumer appliances rarely include a conventional mains switch. Instead, these devices are activated and deactivated using a button on a remote control, similar to other functions. This circuit demonstrates how to control a device (provided it does not draw...

resistors Current flows from the source towards the sink
The circuit is designed to limit the maximum voltage between the GPIO input pin and the current source to 3.3V. This is achieved through a voltage divider configuration where the voltage across the 10K resistor is 3.3V, while the voltage...