


Dry Cell Battery Charger Using LM741
#LM741
#dry cell
#battery charger
#voltage regulator
#resistor
#AA battery
#power supply
#circuit design
#electronics
#charging circuit
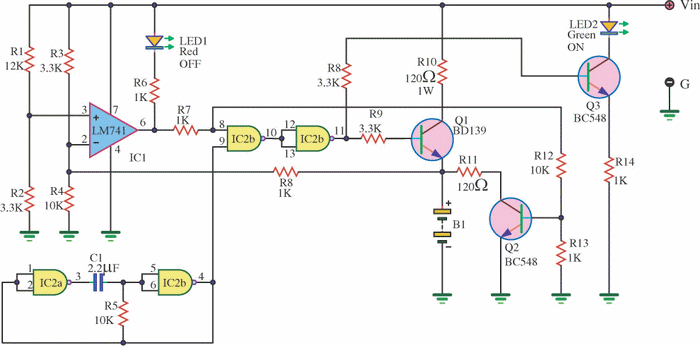
Description: This is a dry cell battery charger circuit designed to charge batteries over a period of approximately 12 hours. When powered by a 9-volt supply, the circuit is configured to accommodate AA-sized batteries. If C or D-sized batteries are used, the value of resistor RX should be reduced to 68 ohms, and the batteries should not be connected in series when the voltage in the cell drops below 1.6V. The circuit also includes a comparator circuit using IC741, which controls the output gate from a pulse oscillator. The CMOS 4011 integrated circuit is utilized to switch the transistor that charges the battery until the voltage reaches 1.6V. Additionally, an LED flasher provides a warning to indicate when the charger is no longer effective. Lastly, it is suggested that if dry cell batteries are depleted, they should not be discarded but instead recharged for reuse.
This dry cell battery charger circuit is designed for efficient charging of standard batteries, particularly AA, C, or D sizes, with an emphasis on safety and functionality. The circuit operates from a 9-volt power supply, making it suitable for various applications. The resistor RX plays a critical role in current limiting; its value must be adjusted based on the size of the battery being charged to prevent overcurrent situations that could lead to battery damage. For C or D batteries, reducing RX to 68 ohms ensures appropriate charging current is provided.
The inclusion of the IC741 comparator circuit is pivotal for monitoring the charging process. This component compares the battery voltage against a predefined threshold of 1.6V, which is essential for determining when to cease charging. If the battery voltage drops below this threshold, the circuit is designed to disconnect the charging current, thereby preventing potential over-discharge and extending battery life.
The pulse oscillator, combined with the CMOS 4011, serves to control the charging process effectively. The transistor acts as a switch, allowing current to flow to the battery only when conditions are met, thereby optimizing the charging efficiency. The LED flasher acts as an indicator, alerting users when the charger is no longer functional or when the battery is fully charged.
In summary, this circuit not only facilitates the charging of dry cell batteries but also incorporates protective measures to enhance safety and prolong battery lifespan. The reuse of depleted batteries is encouraged, promoting sustainability and reducing waste. This design is ideal for hobbyists and professionals looking to implement a reliable battery charging solution.This is Dry Cell Battery Charger Circuit. That can use charger battery get that about 12 hour. When apply to power supply 9 volt the equipment that fix in the circuit use for size battery AA. If use the size C or D should devalue of Resistor RX down be 68ohm and should not lead battery come to serial while voltage in cell battery lower 1. 6V. The C omparator Circuit with (IC741) control Gate output from Pulse Oscillator at use the integrated circuit CMOS 4011 change Transistor that do infront charger battery until voltage tall 1. 6V Comparator Circuit more make LED Flasher warn know for protect Charger battery expire. The next time is if friends have Dry Cell Battery that use be finished already, don`t abandon, try apply new again yes.
This dry cell battery charger circuit is designed for efficient charging of standard batteries, particularly AA, C, or D sizes, with an emphasis on safety and functionality. The circuit operates from a 9-volt power supply, making it suitable for various applications. The resistor RX plays a critical role in current limiting; its value must be adjusted based on the size of the battery being charged to prevent overcurrent situations that could lead to battery damage. For C or D batteries, reducing RX to 68 ohms ensures appropriate charging current is provided.
The inclusion of the IC741 comparator circuit is pivotal for monitoring the charging process. This component compares the battery voltage against a predefined threshold of 1.6V, which is essential for determining when to cease charging. If the battery voltage drops below this threshold, the circuit is designed to disconnect the charging current, thereby preventing potential over-discharge and extending battery life.
The pulse oscillator, combined with the CMOS 4011, serves to control the charging process effectively. The transistor acts as a switch, allowing current to flow to the battery only when conditions are met, thereby optimizing the charging efficiency. The LED flasher acts as an indicator, alerting users when the charger is no longer functional or when the battery is fully charged.
In summary, this circuit not only facilitates the charging of dry cell batteries but also incorporates protective measures to enhance safety and prolong battery lifespan. The reuse of depleted batteries is encouraged, promoting sustainability and reducing waste. This design is ideal for hobbyists and professionals looking to implement a reliable battery charging solution.This is Dry Cell Battery Charger Circuit. That can use charger battery get that about 12 hour. When apply to power supply 9 volt the equipment that fix in the circuit use for size battery AA. If use the size C or D should devalue of Resistor RX down be 68ohm and should not lead battery come to serial while voltage in cell battery lower 1. 6V. The C omparator Circuit with (IC741) control Gate output from Pulse Oscillator at use the integrated circuit CMOS 4011 change Transistor that do infront charger battery until voltage tall 1. 6V Comparator Circuit more make LED Flasher warn know for protect Charger battery expire. The next time is if friends have Dry Cell Battery that use be finished already, don`t abandon, try apply new again yes.
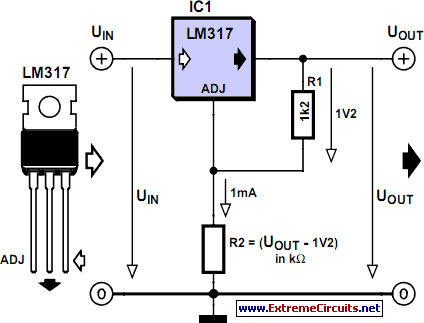
Voltage Regulator Calculation
Before designing an adjustable voltage regulator into a circuit or performing a redesign, it is necessary to calculate the values for two resistors. While this process is straightforward, sourcing the appropriate resistors may present challenges. Fortunately, a method exists to...

FSP107-2PS01 two-in-one power panel circuit analysis
The main component is the LG26 one-inch screens integrated with the FSP107-2PS01 two-in-one electrical power package, which utilizes a direct drive CCFL modulator tube. This setup is compatible with screens from other manufacturers, such as Samsung and AU, but requires...

Lighting controller circuit
The circuit operates with a controller that includes a power supply circuit, a control circuit, and an audio amplifier, which are three distinct components. The power circuit comprises diodes VD1 to VD4, resistor R1, capacitor C1, LED1, LED2, and additional...
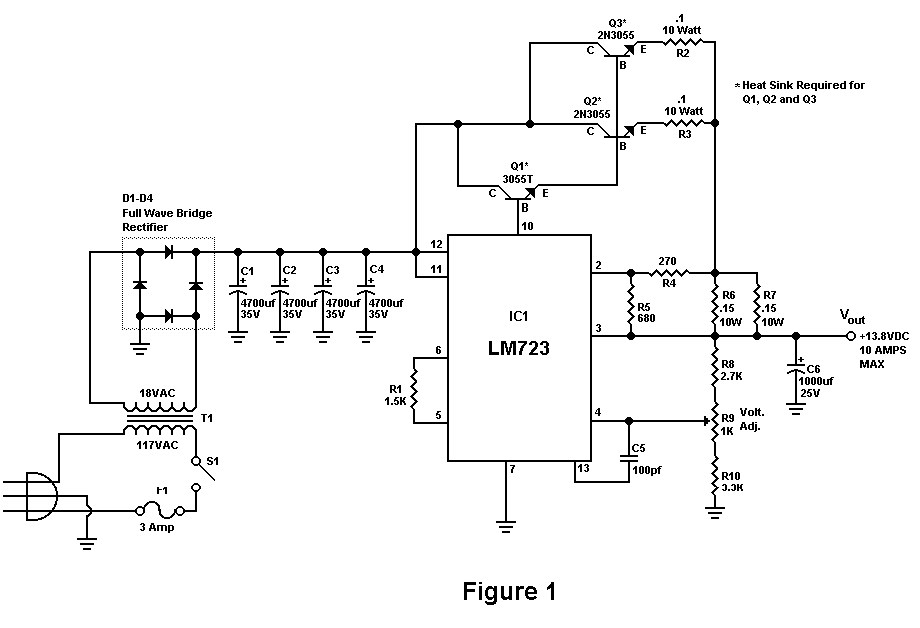
Build A 10 Amp 13.8 Volt Power Supply
Sometimes amateurs like to home-brew their power supplies instead of purchasing one off the shelf at any of the major ham radio retail dealers. The advantage to rolling your own power supply is that it teaches us how they work...
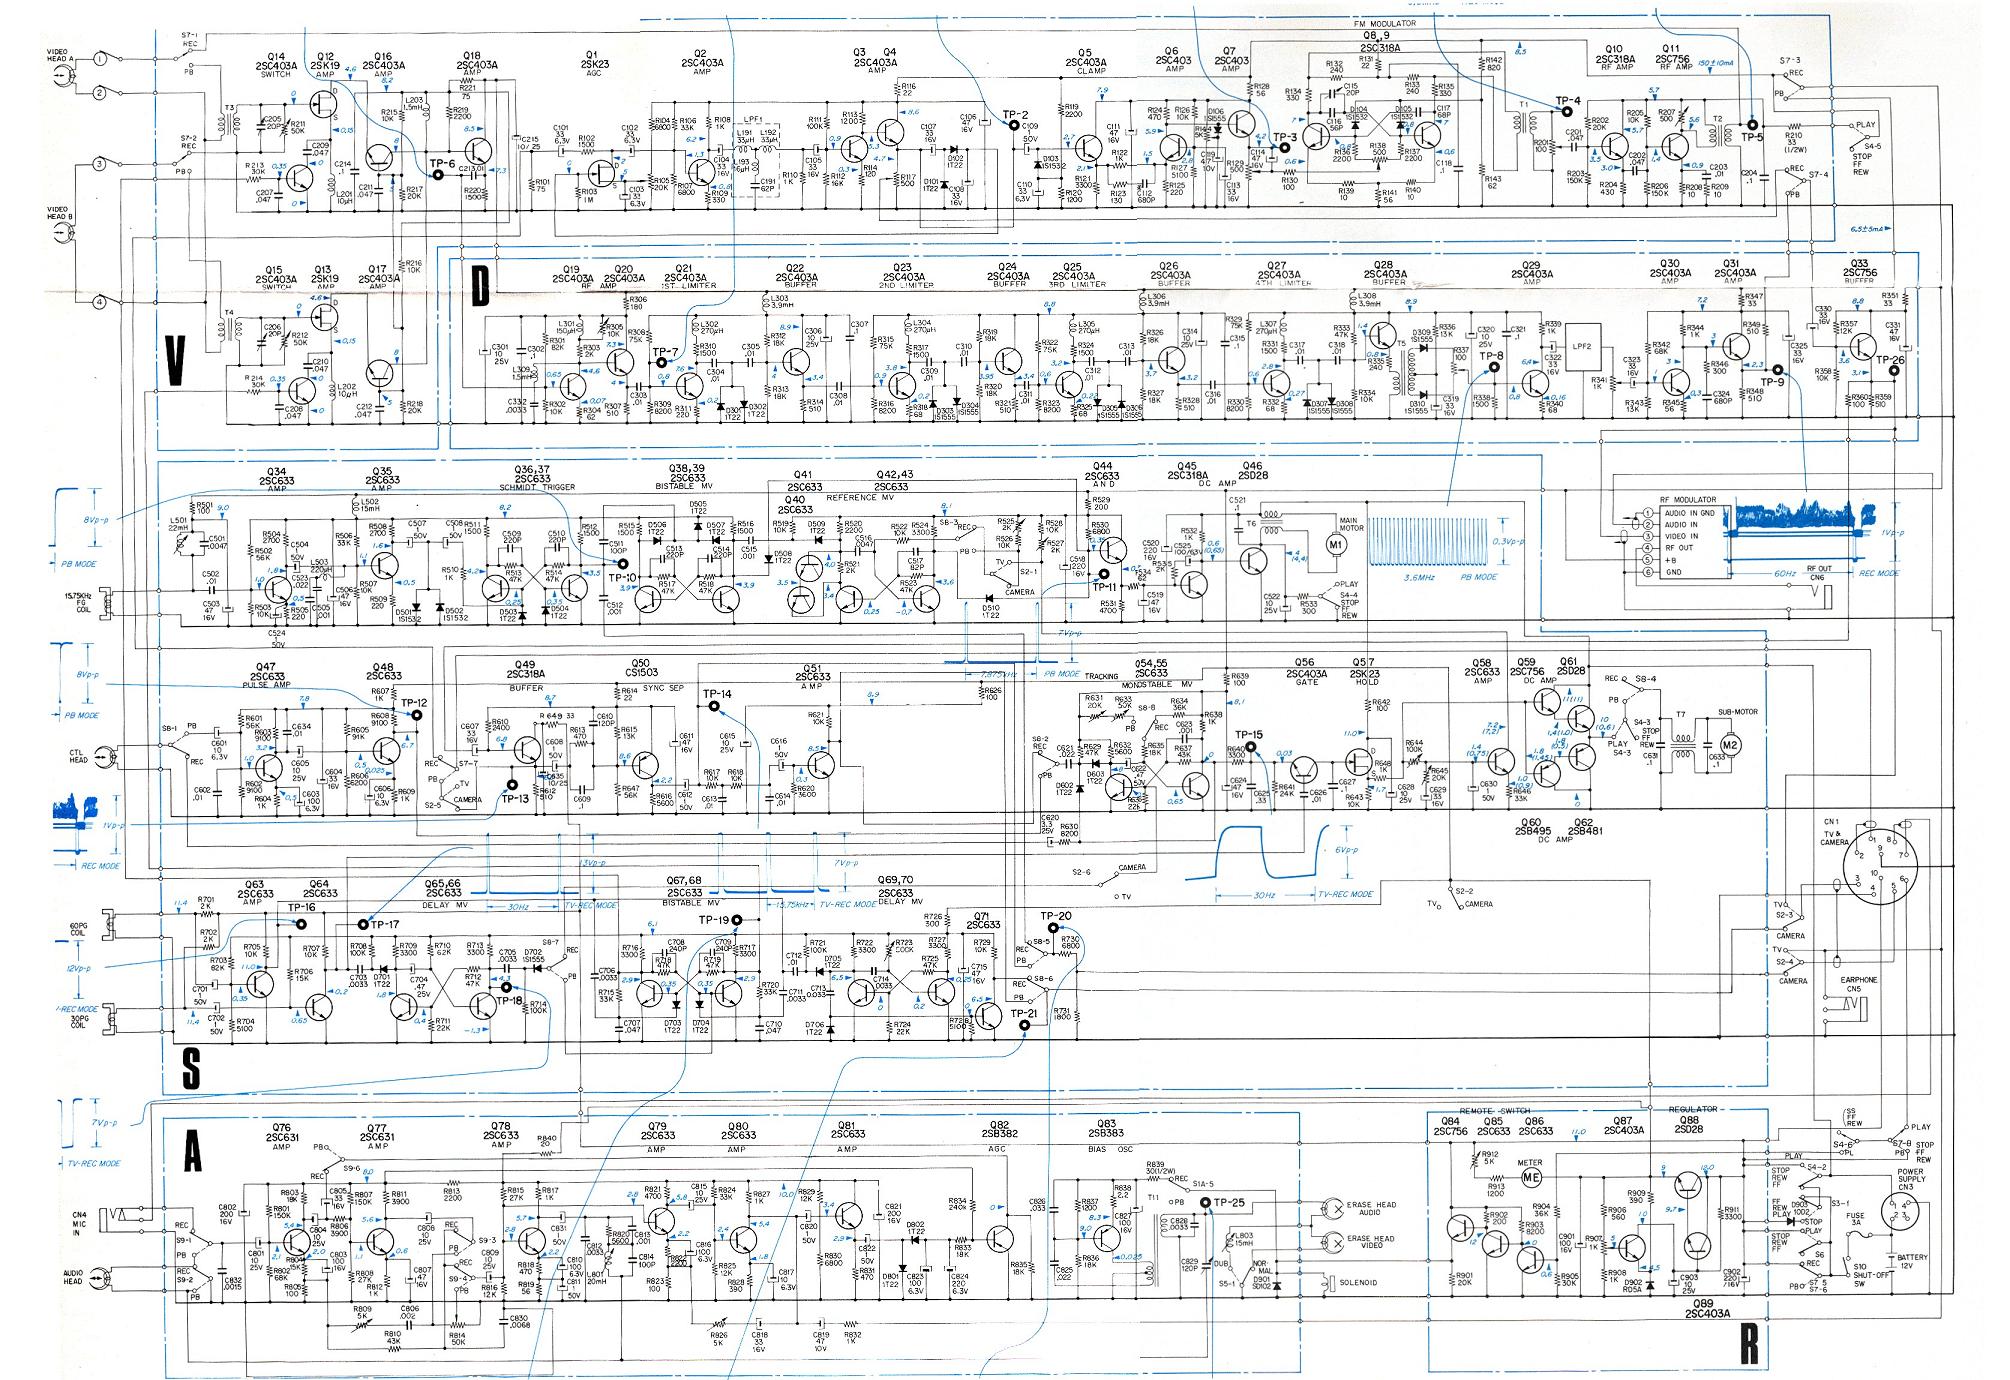
Eng Sony AV 3400
The original power supply AC-3400 features a charger function. In addition to the power button and the indicator light for power status, the front panel includes a charge level indicator for the accumulator, a start button, and a socket for...

1.3V Power supply
This 1.3V power supply can serve as a replacement for the 1.3V Mercury Cell in any circuit. When a 5V input is applied to the circuit, the voltage drop across the Zener diode D1 will be approximately 2V. The diode...

Thrifty Voltage Regulator
One of the drawbacks of a three-pin voltage regulator is that the input voltage needs to be 2.5 to 3 V higher than the output voltage. This makes these integrated regulators unsuitable for battery power supplies. For instance, if the...

Expand integrated three-terminal regulator block circuit output current method
Expand integrated three-terminal regulator block circuit output current method
The integrated three-terminal regulator is a versatile component commonly used in power supply circuits to provide a stable output voltage. This regulator typically consists of three terminals: input, output, and ground. The...

Shortcircuit protected voltage regulator
At this voltage regulator prototype the maximum current, with output shortcircuited it was only 0.5 A, so no overheating occurred. In this DC voltage regulator circuit, T1 is for current limitation. As soon as the voltage on the R2 +...