


dome light dimmer (with delay)
#dome light
#dimmer
#delay circuit
#courtesy light
#theatre lighting
#fading light
#automotive lighting
#LED
#PWM
#light control

Description: Introduction and disclaimer for individuals interested in a fading dome light (also referred to as courtesy light or theatre lighting) without incurring high costs.
A fading dome light circuit is designed to create a gradual illumination effect, enhancing the aesthetic appeal and functionality of interior lighting in vehicles or residential spaces. This type of circuit typically utilizes a combination of resistors, capacitors, and a transistor or integrated circuit to achieve the desired fading effect.
The core component of the circuit is usually a capacitor, which charges and discharges over time, allowing for a smooth transition in brightness. When the circuit is activated, the capacitor begins to charge through a resistor, gradually increasing the voltage across the load (the light source). As the voltage rises, the light intensity increases until it reaches a predetermined level. Subsequently, the capacitor discharges, causing the light to dim gradually back to zero.
To implement this circuit, a few key components are necessary:
1. **Power Source**: A DC power supply, typically from the vehicle's battery or a wall adapter for home use.
2. **Transistor or MOSFET**: Acts as a switch to control the current flow to the light source, allowing for the fading effect.
3. **Capacitor**: Determines the timing of the fade effect; larger capacitance results in a slower fade.
4. **Resistor**: Works in conjunction with the capacitor to control the charging and discharging rate, thereby influencing the fade duration.
5. **Light Source**: This can be an LED or incandescent bulb, depending on the desired brightness and power consumption.
The circuit may also include additional features such as a potentiometer for adjusting the fade time or a microcontroller for more complex fading patterns. Properly designed, this circuit not only enhances the ambiance of a space but also provides a smoother transition that is easier on the eyes compared to abrupt lighting changes.
To ensure safety and reliability, it is essential to select components that can handle the expected current and voltage levels, and to implement protective measures such as fuses or circuit breakers where necessary. Proper PCB layout and soldering techniques should also be followed to avoid potential issues with signal integrity and component failure.Intro & disclaimer For all you guys out there that want a fading dome light (aka courtesy light aka theatre lighting) without having to pay for..
A fading dome light circuit is designed to create a gradual illumination effect, enhancing the aesthetic appeal and functionality of interior lighting in vehicles or residential spaces. This type of circuit typically utilizes a combination of resistors, capacitors, and a transistor or integrated circuit to achieve the desired fading effect.
The core component of the circuit is usually a capacitor, which charges and discharges over time, allowing for a smooth transition in brightness. When the circuit is activated, the capacitor begins to charge through a resistor, gradually increasing the voltage across the load (the light source). As the voltage rises, the light intensity increases until it reaches a predetermined level. Subsequently, the capacitor discharges, causing the light to dim gradually back to zero.
To implement this circuit, a few key components are necessary:
1. **Power Source**: A DC power supply, typically from the vehicle's battery or a wall adapter for home use.
2. **Transistor or MOSFET**: Acts as a switch to control the current flow to the light source, allowing for the fading effect.
3. **Capacitor**: Determines the timing of the fade effect; larger capacitance results in a slower fade.
4. **Resistor**: Works in conjunction with the capacitor to control the charging and discharging rate, thereby influencing the fade duration.
5. **Light Source**: This can be an LED or incandescent bulb, depending on the desired brightness and power consumption.
The circuit may also include additional features such as a potentiometer for adjusting the fade time or a microcontroller for more complex fading patterns. Properly designed, this circuit not only enhances the ambiance of a space but also provides a smoother transition that is easier on the eyes compared to abrupt lighting changes.
To ensure safety and reliability, it is essential to select components that can handle the expected current and voltage levels, and to implement protective measures such as fuses or circuit breakers where necessary. Proper PCB layout and soldering techniques should also be followed to avoid potential issues with signal integrity and component failure.Intro & disclaimer For all you guys out there that want a fading dome light (aka courtesy light aka theatre lighting) without having to pay for..

Solar Charged LED Utility Light
Tired of always spending money on flashlight batteries only to have them fail just when you need them? Try this simple circuit out. It would make an excellent science fair project. The white LEDs are quite bright, they provide enough...

1.5 Volt LED Flasher Circuits
The LED flasher circuits below operate on a single 1.5 volt battery. The circuit on the upper right uses the popular LM3909 LED flasher IC and requires only a timing capacitor and LED. The top left circuit, designed by Andre...

PWM v2.1 plans
Detailed plans to build devices for HHO, HOH, HOD, PWM pulse width modulators, and EFIE electronic fuel injection enhancers.
The schematic for constructing devices related to HHO (Hydrogen-Hydrogen-Oxygen) production, HOH (Water), HOD (Hydrogen-Oxygen-Diatomic), PWM (Pulse Width Modulation) controllers, and EFIE (Electronic...

flip flop led flashing circuit
A schematic of a flip-flop LED flashing circuit is presented. This circuit functions as an astable multivibrator that activates LEDs sequentially upon power application. It is compatible with voltage inputs ranging from 6 to 12 volts, and can also operate...

Bicycle Back Safety Light Circuit Schematic
This circuit is designed to produce a clearly visible light using 13 high-efficiency flashing LEDs arranged in a pseudo-rotating pattern. It operates on low voltage and is optimized for low battery drain, making it suitable for mounting on bicycles as...

LED VoltMeter Circuit
A simple LED voltmeter is designed to monitor the charge level in a lead-acid battery or tubular battery. The terminal voltage of the battery is displayed using four LED indicators. The nominal terminal voltage for a lead-acid battery is 13.8...

Led indicates logic states
The CSL310L is a dual-color LED that incorporates a red LED and a green LED arranged back to back within a single housing. This LED can emit either red or green light depending on the polarity of the applied voltage....
LED Bike Light Circuit Project
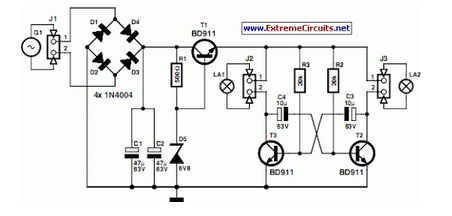
A front wheel with a built-in dynamo was purchased, providing a sine wave output of 30 Vpp at no load. Based on this, a simple power supply was designed using BD911 transistors, which are somewhat oversized for the application, but...

40 segment led s meter
Provide your radio with an actual cord signal. First, adjust the HIGH LEVEL potentiometer to the point where all LEDs are illuminated. Then, completely remove the signal and adjust the LOW LEVEL potentiometer until no LEDs are lit. If the...