


clap on/off switch circuit using pic10f222
#PIC10F222
#clap switch
#sound activated
#on/off switch
#microcontroller
#DIY
#home automation
#electronic switch
Description: Instructions for creating a Clap-Clap On/Clap-Clap Off switch circuit. This guide provides the necessary information for constructing a clap-activated switch.
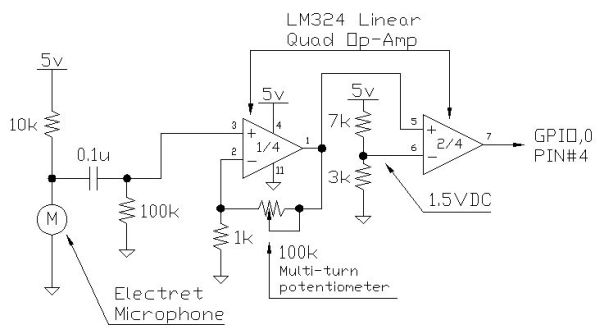
The Clap-Clap switch circuit is an innovative design that utilizes sound activation to control electronic devices. The primary components of this circuit typically include a microphone, an operational amplifier (op-amp), a microcontroller, and a relay or transistor to switch the load.
The microphone captures sound waves, specifically claps, and converts them into an electrical signal. This signal is then amplified using the op-amp, which enhances the signal strength to make it more suitable for processing. The amplified signal is fed into a microcontroller programmed to recognize the specific pattern of two consecutive claps.
Once the microcontroller detects the clap pattern, it sends a signal to activate a relay or transistor, which in turn switches the connected load on or off. The relay acts as an electronic switch, allowing for the control of higher voltage devices while keeping the low voltage components of the circuit safe.
To ensure proper functionality, it is essential to calibrate the microphone sensitivity and the timing within the microcontroller to accurately detect the clap sound without false triggers from background noise. Power supply considerations must also be made, ensuring that the circuit operates within the voltage and current ratings of the components used.
This Clap-Clap switch circuit is suitable for various applications, including home automation systems, where users can control lights or appliances simply by clapping, offering a convenient hands-free operation.How to make a Clap-Clap on / Clap-Clap Off switch circuit! Hi all! This instructable not only gives the reader the information needed to create a clap-clap..
The Clap-Clap switch circuit is an innovative design that utilizes sound activation to control electronic devices. The primary components of this circuit typically include a microphone, an operational amplifier (op-amp), a microcontroller, and a relay or transistor to switch the load.
The microphone captures sound waves, specifically claps, and converts them into an electrical signal. This signal is then amplified using the op-amp, which enhances the signal strength to make it more suitable for processing. The amplified signal is fed into a microcontroller programmed to recognize the specific pattern of two consecutive claps.
Once the microcontroller detects the clap pattern, it sends a signal to activate a relay or transistor, which in turn switches the connected load on or off. The relay acts as an electronic switch, allowing for the control of higher voltage devices while keeping the low voltage components of the circuit safe.
To ensure proper functionality, it is essential to calibrate the microphone sensitivity and the timing within the microcontroller to accurately detect the clap sound without false triggers from background noise. Power supply considerations must also be made, ensuring that the circuit operates within the voltage and current ratings of the components used.
This Clap-Clap switch circuit is suitable for various applications, including home automation systems, where users can control lights or appliances simply by clapping, offering a convenient hands-free operation.How to make a Clap-Clap on / Clap-Clap Off switch circuit! Hi all! This instructable not only gives the reader the information needed to create a clap-clap..

Domestic And Industrial
This is a simple and inexpensive clap-operated switch that utilizes only four transistors along with a resistor-capacitor network. The project name indicates its application, which can be used for level control in hydroponic projects and for kitchen purposes, such as...

Sound Trigered Camera flash
If you wish to take a picture of a fleeting event which generates a sound, you can do it with this sound activated trigger. It does not require any power supply: it feeds on the high voltage available on the...

Controlling high-current circuits
Digital output from a microcontroller is typically a low-amperage signal. For example, when a pin is set HIGH on the microcontroller (in Wiring/Arduino, it is digitalWrite(somePin, HIGH);), the voltage from that pin is usually +3.3V or +5V, with the current...

Microcontroller based College Automation System
This project is a microcontroller-based college automation system aimed at addressing the challenges faced in educational institutions. It replaces the conventional notice board with an automated device that allows users to both hear and read the information being announced through...

The embedded microcontroller MC68HC912B32 background debugs the mode to design
The widespread application of Flash technology in microprocessors has led to significant advancements in the development and utilization of one-chip computers. Designers have transitioned from traditional in-circuit emulators (ICE) and JTAG interfaces to more cost-effective and user-friendly development methods. While...

DC motor driver for DCMP(AVR-008)
A microcontroller is used to control various types of DC motors, including permanent magnet DC motors, DC servo motors, and stepper motors. This project utilizes the AVR-008 microcontroller from Circuits-Home, which is frequently referred to as the 3-in-1 driver motor...

analog light dimmer circuit connected to microcontroller
Assistance is required to modify a light dimmer circuit connected to a PIC12C508 microcontroller. This circuit is designed for the...
The light dimmer circuit utilizing the PIC12C508 microcontroller serves to control the brightness of a light source through pulse width modulation...

Sensor Circuit Of Analog Line Follower Robot
The following circuit illustrates the sensor circuit of an analog line follower robot. Features include control by a microcontroller and a sensor circuit.
The sensor circuit for an analog line follower robot is designed to detect the presence of a line...

microcontroller How does this power supply circuit work? (MCU + LM317)
The filter consisting of resistors R1, R2, and capacitor C1 integrates the PWM waveform. The purpose of the operational amplifier appears to be that of a non-inverting amplifier, with the gain determined by resistors R6 and R7. However, the need...