


Electronic locust killer device 2
#square wave oscillator
#high-voltage generator
#transistor
#relay
#counting divider
#potentiometer
#capacitor
#resistor

Description: The electronic locust killer device consists of a square wave oscillator circuit and a high-voltage generator circuit, as illustrated in Figure 3-192. The square wave oscillator comprises a counting divider IC, resistors R5 and R6, capacitor C1, and potentiometer RP. The high-voltage generator is made up of transistors Q1 and Q2, along with relay K.
The electronic locust killer device operates by generating a high-frequency square wave signal through the square wave oscillator. The counting divider integrated circuit (IC) is responsible for dividing the frequency of the input signal to produce a square wave output. Resistors R5 and R6 are used to set the timing characteristics of the oscillator, while capacitor C1 helps in shaping the waveform. Potentiometer RP allows for fine-tuning of the frequency, enabling the device to adapt to different environments or target locust populations effectively.
The high-voltage generator circuit is activated by the square wave output from the oscillator. Transistors Q1 and Q2 are arranged in a push-pull configuration to amplify the signal and generate a high-voltage output. Relay K serves as a switch that is triggered by the output from the transistors, enabling the high-voltage circuit to discharge at the appropriate moment to incapacitate locusts. This combination of circuits allows for effective pest control by utilizing electrical discharge to deter or eliminate locust populations in agricultural settings.
Overall, the design of the electronic locust killer device integrates these components to create a reliable and efficient method for managing locust infestations, thereby protecting crops and enhancing agricultural productivity.The electronic locust killer device is composed of the square wave oscillator circuit and high-voltage generator circuit, and the cirucuit is shown in Figure 3-192. Square-wave oscillator is composed of the counting divider lC and resistors R5, R6, capacitor Cl and potentiometer RP.
High-voltage generator is composed of the transistors VI, V2, the relay K, r..
The electronic locust killer device operates by generating a high-frequency square wave signal through the square wave oscillator. The counting divider integrated circuit (IC) is responsible for dividing the frequency of the input signal to produce a square wave output. Resistors R5 and R6 are used to set the timing characteristics of the oscillator, while capacitor C1 helps in shaping the waveform. Potentiometer RP allows for fine-tuning of the frequency, enabling the device to adapt to different environments or target locust populations effectively.
The high-voltage generator circuit is activated by the square wave output from the oscillator. Transistors Q1 and Q2 are arranged in a push-pull configuration to amplify the signal and generate a high-voltage output. Relay K serves as a switch that is triggered by the output from the transistors, enabling the high-voltage circuit to discharge at the appropriate moment to incapacitate locusts. This combination of circuits allows for effective pest control by utilizing electrical discharge to deter or eliminate locust populations in agricultural settings.
Overall, the design of the electronic locust killer device integrates these components to create a reliable and efficient method for managing locust infestations, thereby protecting crops and enhancing agricultural productivity.The electronic locust killer device is composed of the square wave oscillator circuit and high-voltage generator circuit, and the cirucuit is shown in Figure 3-192. Square-wave oscillator is composed of the counting divider lC and resistors R5, R6, capacitor Cl and potentiometer RP.
High-voltage generator is composed of the transistors VI, V2, the relay K, r..
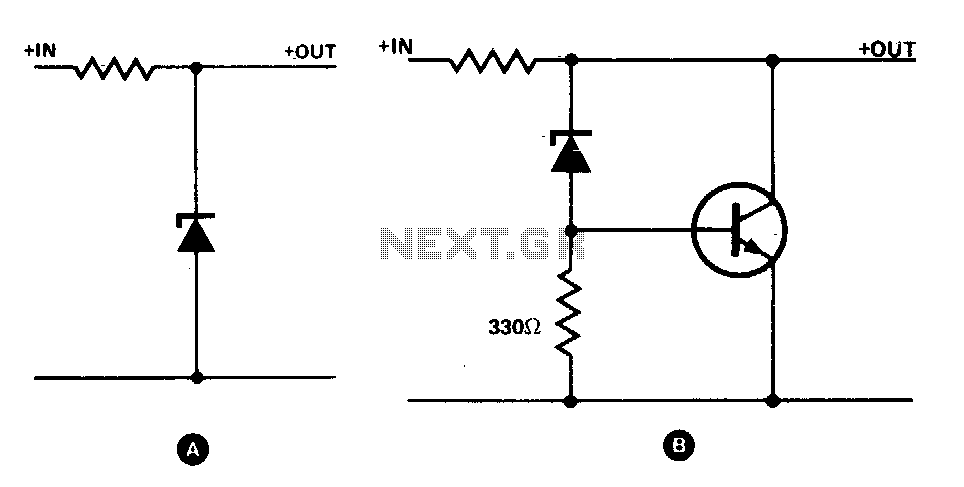
Transistor increases zener rating
The simple zener shunt in configuration A may not handle sufficient current if the zener diode available is of low wattage. A power transistor will perform most of the work for the zener as illustrated in configuration B. Once the...

motorcycle headlight with single spdt relay
A bike equipped with a 35-watt HS1 bulb is being upgraded to a brighter headlight using an H4 60/65-watt xenon bulb. An expert recommended using relays due to the increased power requirements of the new bulb. Research conducted on relay...
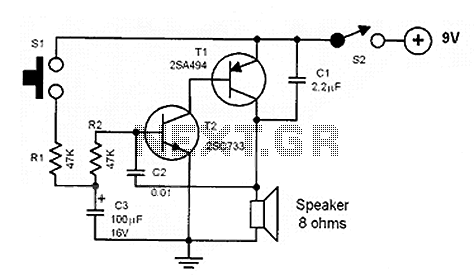
Noise making circuits
The core of the circuit is a two-transistor flasher with frequency modulation applied to the base of the first transistor. When the pushbutton is pressed, the oscillation frequency increases to a peak, and upon release, the frequency decreases due to...

Transistor Circuits
It had been a little over a decade since the invention of the transistor when this article appeared in the August 1959 edition of Popular Electronics. Transistors were still a mystery to many, including engineers, technicians, and hobbyists. Author James...

Power Control
The circuit presented utilizes a two-transistor "flasher" to generate triggering pulses, replacing the traditional unijunction transistor design. This configuration allows for a broad range of control with minimal hysteresis and sensitivity to line voltage. Two diodes rectify the line voltage,...

T3SE type 3 SE
The all-transistor T3SE operates similarly to a conventional switch mode power supply (SE). Like the Tritium model, it activates when the charging current falls below a specified threshold. After the circuit is triggered, positive feedback is utilized to latch the...
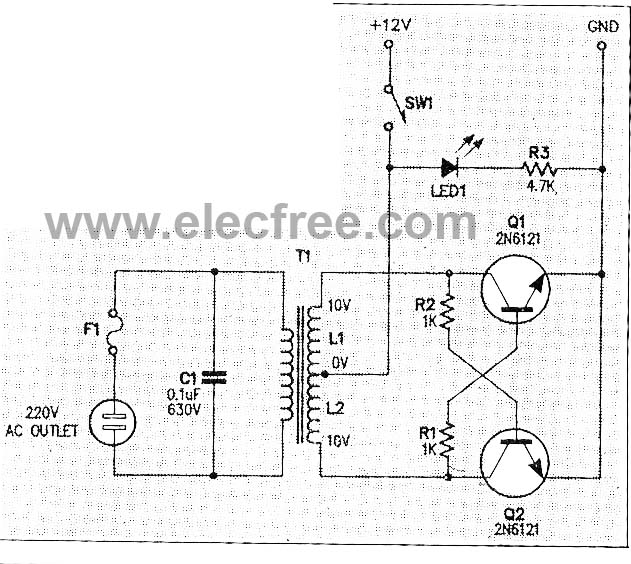
Micro Inverter by 2N6121
This micro inverter is a small-sized device that modifies energy from a battery, producing an output voltage of approximately 220V AC at 50Hz. The circuit comprises two transistors that function as a pulse oscillator or square wave generator, driving a...

metal detector circuit
This project involves a simple metal detector circuit that is easy to construct using a single transistor and a few additional components. The circuit operates as a Colpitts oscillator, broadcasting on the AM band. To use it, place a quality...

transistors LC circuit
Build the LC oscillator shown at the bottom of this page for a school project, but there are some challenges in translating the theoretical circuit into a real-world application. The understanding of the circuit's operation on paper is clear. It...