


Brushless DC (BLDC) motor with Arduino
#arduino
#BLDC motor
#motor driver
#microcontroller
#PWM
#DVD spindle motor
#speed control
#MCU
#brushless motor
#motor control

Description: Arduino sketch and other useful information about driving a brushless DC motor, such as a DVD drive spindle motor, using Arduino or another microcontroller.
The task of driving a brushless DC motor, particularly one sourced from a DVD drive spindle, can be effectively accomplished using an Arduino or similar microcontroller unit (MCU). Brushless DC motors, known for their efficiency and reliability, require specific control strategies to manage their operation. The following outlines the essential components and considerations for designing a circuit to control such a motor.
The primary component of the system is the brushless DC motor itself, which typically consists of a rotor with permanent magnets and a stator with windings. Control of the motor can be achieved using an electronic speed controller (ESC) or through direct PWM (Pulse Width Modulation) control by the Arduino. When using an ESC, the motor can be controlled by sending PWM signals that dictate the speed and direction of rotation.
The Arduino board serves as the central processing unit, where the sketch (program) is written to determine the motor's behavior. The sketch should include the necessary libraries for PWM generation and potentially for interfacing with the ESC. The output pins of the Arduino are connected to the signal input of the ESC, while the ESC is connected to the motor and a suitable power supply.
Additional components may include capacitors to smooth voltage fluctuations, diodes for back EMF protection, and resistors for current limiting, depending on the design specifics. It is crucial to ensure that the power supply matches the voltage and current specifications of both the motor and the ESC to prevent damage.
Safety precautions should be considered, as brushless motors can generate significant torque and may pose risks during operation. Proper mounting and housing of the motor, along with emergency stop mechanisms, are recommended.
In summary, driving a brushless DC motor with an Arduino involves careful selection of components, programming the microcontroller for appropriate control, and ensuring safety measures are in place for effective and reliable operation.Arduino sketch and other useful information about driving a brushless DC motor, such as DVD drive spindle motor, using Arduino or another MCU
The task of driving a brushless DC motor, particularly one sourced from a DVD drive spindle, can be effectively accomplished using an Arduino or similar microcontroller unit (MCU). Brushless DC motors, known for their efficiency and reliability, require specific control strategies to manage their operation. The following outlines the essential components and considerations for designing a circuit to control such a motor.
The primary component of the system is the brushless DC motor itself, which typically consists of a rotor with permanent magnets and a stator with windings. Control of the motor can be achieved using an electronic speed controller (ESC) or through direct PWM (Pulse Width Modulation) control by the Arduino. When using an ESC, the motor can be controlled by sending PWM signals that dictate the speed and direction of rotation.
The Arduino board serves as the central processing unit, where the sketch (program) is written to determine the motor's behavior. The sketch should include the necessary libraries for PWM generation and potentially for interfacing with the ESC. The output pins of the Arduino are connected to the signal input of the ESC, while the ESC is connected to the motor and a suitable power supply.
Additional components may include capacitors to smooth voltage fluctuations, diodes for back EMF protection, and resistors for current limiting, depending on the design specifics. It is crucial to ensure that the power supply matches the voltage and current specifications of both the motor and the ESC to prevent damage.
Safety precautions should be considered, as brushless motors can generate significant torque and may pose risks during operation. Proper mounting and housing of the motor, along with emergency stop mechanisms, are recommended.
In summary, driving a brushless DC motor with an Arduino involves careful selection of components, programming the microcontroller for appropriate control, and ensuring safety measures are in place for effective and reliable operation.Arduino sketch and other useful information about driving a brushless DC motor, such as DVD drive spindle motor, using Arduino or another MCU

arduino intervalometer
An intervalometer for the Canon 400D camera has been developed. This device is based on an Arduino platform and utilizes code adapted from the creator of the Intervaluino project.
The intervalometer is a specialized electronic device designed to automate the process...

Digital Calender Circuit
This is a digital calendar circuit that utilizes a microcontroller to display the date, day, and month on an LED display. The entire system is managed by an 8-bit microcontroller, which operates based on a program embedded in its ROM....

arduino electronics
The example circuit and code should be sufficient to begin without delving into additional details. A rotary encoder is an electromechanical component with a shaft that records rotation and converts it into electrical pulses to indicate the direction of rotation....

arduino multiplexer shield
There is enthusiasm for using Arduinos in science projects. However, it is important to address several shortcomings of the Arduino before it can be utilized for more serious applications. Specifically, the addition of robust screw terminals is necessary.
The Arduino platform...
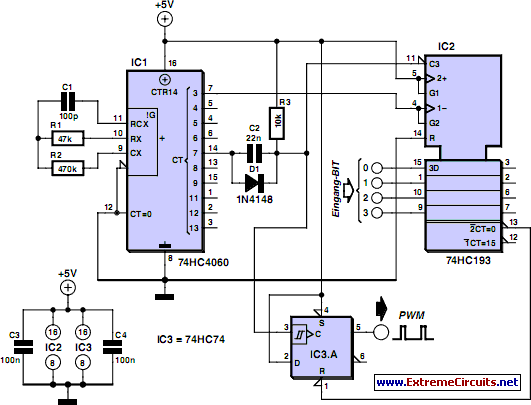
Discrete PWM Generator Circuit
PWM waveforms are frequently employed to regulate the speed of DC motors. The mark/space ratio of the digital waveform can be established either by utilizing an adjustable analog voltage level (as seen in a NE555-based PWM generator) or through digital...
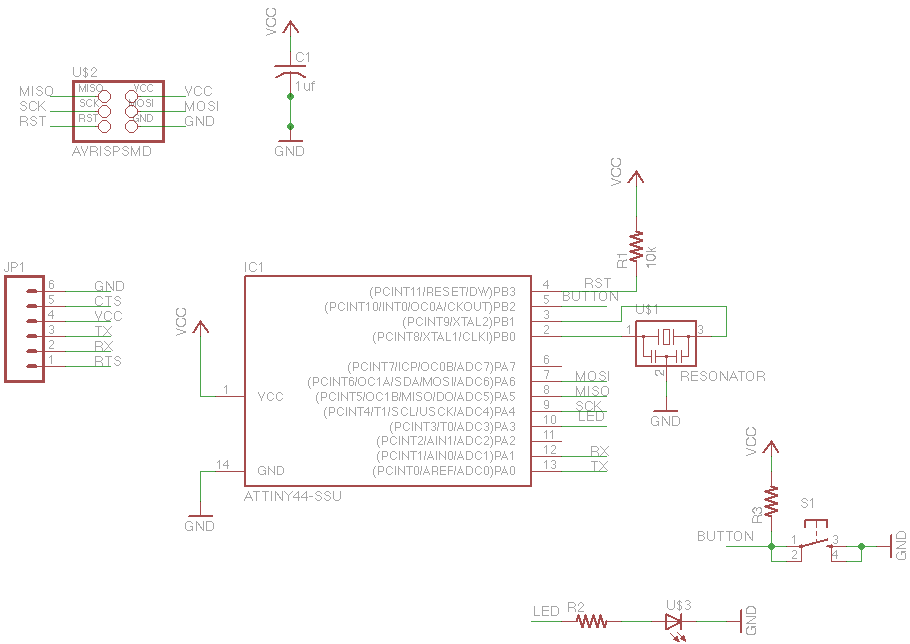
Microcontroller Programming 2
For this week's assignment, a chip design was provided, and the task was to incorporate a button and an LED (light-emitting diode). The objective was to fabricate the chip and program it to interact with the light and button. Given...

Arduino FM radio receiver shield
This guide will demonstrate how to construct a custom FM radio receiver shield compatible with an Arduino board. The radio chip utilized in this project is the AR1010, which can be sourced from Sparkfun or Electrokit. Code for initializing the...

arduino LCD
This tutorial demonstrates how to connect an LCD display to an Arduino and test it. It provides a step-by-step guide for beginners on using a breadboard to establish the connection.
To connect an LCD display to an Arduino, first gather the...
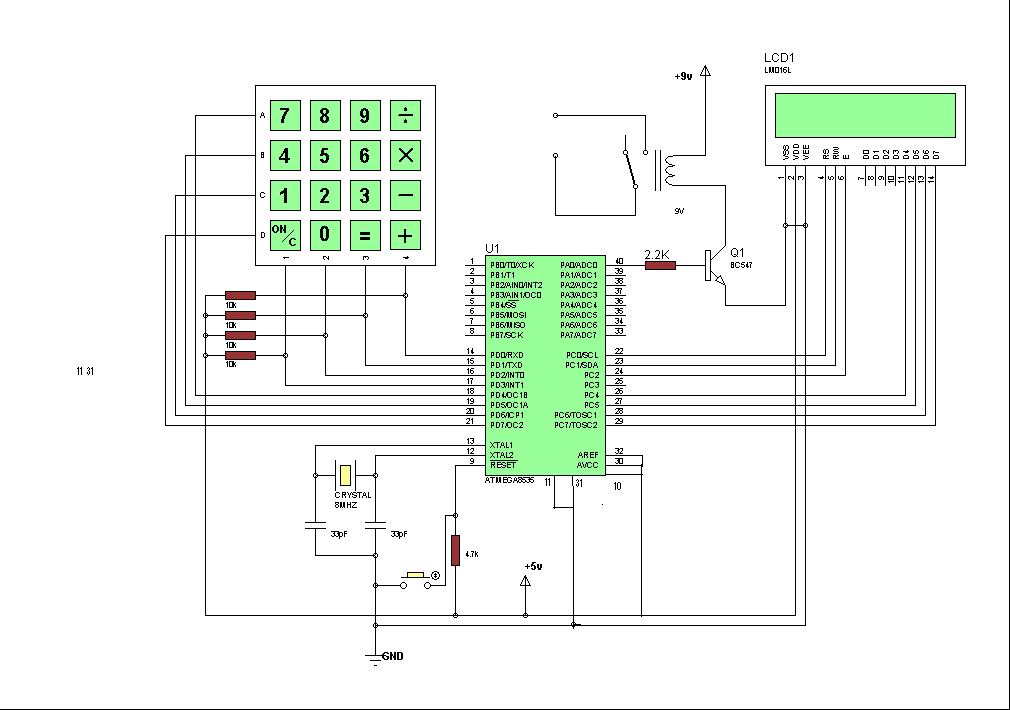
Secured room access system
Security is a primary concern in daily life, and an access control system is a crucial component of a security framework. The microcontroller-based digital lock described here is an access control system that permits only authorized individuals to enter a...