


Smart Cooling Fan Circuit
#cooling fan
#12V
#smart control
#temperature regulation
#automation
#PWM
#fan speed control
#energy saving
#thermal management

Description: A continuously running cooling fan can be a significant nuisance and is not essential for most instruments. The 12V smart fan control presented here allows the fan to operate only when necessary.
The 12V smart fan control circuit is designed to optimize the operation of cooling fans in electronic devices, minimizing noise and energy consumption. This circuit employs a temperature sensor, typically a thermistor or an LM35, to monitor the ambient temperature. When the temperature exceeds a predetermined threshold, the circuit activates the fan, ensuring efficient cooling only when required.
The core of the circuit consists of a microcontroller or comparator that processes the temperature readings from the sensor. The microcontroller can be programmed to adjust the fan speed based on temperature variations, allowing for a more responsive cooling solution. For instance, at lower temperatures, the fan may operate at a reduced speed, while at higher temperatures, it can ramp up to maximum speed to facilitate effective heat dissipation.
Power supply considerations are crucial; the circuit should be powered by a stable 12V source. Additionally, the use of a MOSFET or transistor as a switch allows for controlling the fan's operation without significant losses in efficiency. The circuit may also include protection features such as over-temperature shutdown or reverse polarity protection to enhance reliability.
In summary, the 12V smart fan control circuit not only minimizes unnecessary fan operation but also contributes to the longevity of both the fan and the electronic device it serves by preventing overheating and reducing wear and tear. This design is particularly beneficial in applications where noise reduction is a priority, such as in audio equipment, computer systems, and sensitive instrumentation.A continuously running cooling fan is a big nuisance and is not very crucial in most instruments. The 12V smart fan control presented here allows the fan t..
The 12V smart fan control circuit is designed to optimize the operation of cooling fans in electronic devices, minimizing noise and energy consumption. This circuit employs a temperature sensor, typically a thermistor or an LM35, to monitor the ambient temperature. When the temperature exceeds a predetermined threshold, the circuit activates the fan, ensuring efficient cooling only when required.
The core of the circuit consists of a microcontroller or comparator that processes the temperature readings from the sensor. The microcontroller can be programmed to adjust the fan speed based on temperature variations, allowing for a more responsive cooling solution. For instance, at lower temperatures, the fan may operate at a reduced speed, while at higher temperatures, it can ramp up to maximum speed to facilitate effective heat dissipation.
Power supply considerations are crucial; the circuit should be powered by a stable 12V source. Additionally, the use of a MOSFET or transistor as a switch allows for controlling the fan's operation without significant losses in efficiency. The circuit may also include protection features such as over-temperature shutdown or reverse polarity protection to enhance reliability.
In summary, the 12V smart fan control circuit not only minimizes unnecessary fan operation but also contributes to the longevity of both the fan and the electronic device it serves by preventing overheating and reducing wear and tear. This design is particularly beneficial in applications where noise reduction is a priority, such as in audio equipment, computer systems, and sensitive instrumentation.A continuously running cooling fan is a big nuisance and is not very crucial in most instruments. The 12V smart fan control presented here allows the fan t..

Build This Simple Power Supply For Your Intruder Alarm Project
This power supply is designed for the Modular Burglar Alarm but is suitable for various applications. It delivers a 12-volt output with a maximum current of 1 amp. In case of a mains failure, the backup battery activates immediately, and...

The electronic energy saving lamp maintenance circuit diagram
The saving lamp circuit features two main types: glass cover and exposed. The glass cover variants include three series: spherical, cylindrical, and processing types. The first two series consist of four variations: transparent, carved, engraved, and white. These lamps are...
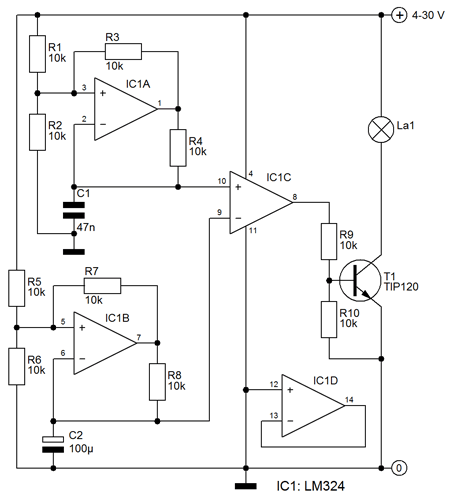
12V smooth Flashing circuit
This circuit ensures that a blinking slowly, ie the lamp is brighter lights until a maximum is reached and then gradually decrease in strength until the lamp is off. IC1a opamp is used here to a triangular voltage generation. The...

12v 30a regulated power supply
The input transformer is likely to be the most expensive component of the entire project. Alternatively, a pair of 12 Volt car batteries could be utilized. The input voltage to the regulator must be several volts higher than the output...

Reasonable Car Battery Charger
This charger will charge any 12V lead acid battery including flooded, gel and AGM. It is fully automatic and will charge at a rate up to about 4A until the battery voltage reaches a preset point at which it will...

PWM DC motor speed control circuit
The circuit operates using pulse position modulation, which is a method distinct from the more commonly utilized pulse width modulation for speed control. A 555 timer is employed as a square wave modulator, generating output pulses with a fixed width...

Motor Speed Control Using PWM
Pulse width modulation, commonly referred to as PWM, is utilized to regulate the power supplied to a load without sacrificing efficiency. This technique is often employed in controlling the speed of an electric motor.
PWM operates by varying the width of...

12V Light Dimmer Circuit
A light dimmer is quite uncommon in a caravan or on a boat. This document outlines how to create one, allowing for mood adjustment when needed.
A light dimmer circuit is an essential component for enhancing the ambiance in confined spaces...

Electronic pulse circuitry fishing
The circuit utilizes the SC3525A, a PWM silicon chip from US General Semiconductor. It features an error amplifier with an inverting input at pin 1. Pin 2 serves as the non-inverting input for the error amplifier. Pins 5 and 6...