


tv restoration
#Variac
#voltage control
#TV restoration
#old electronics
#power management
#120V
#voltage regulation
#electronics repair
#slow power-up
#safety

Description: One should avoid plugging in an old radio or TV that has not been used for many years and immediately turning on the power switch. Instead, it is advisable to use a device known as a Variac, which gradually increases the voltage to a full 120 volts over several hours or even days. The process begins at around 20 volts, with increments of about 10 volts every few hours, while monitoring for any adverse reactions, such as smoke or fire, until reaching the normal household voltage of 120 volts. In this instance, the TV was already plugged in, suggesting previous attempts to power it on. After a brief warm-up period, the TV displayed near-perfect sound but had a blurry, rolling, and out-of-sync picture, indicating that the picture tube was functional. The set was purchased for $30, and although restoration experience was primarily with vintage washing machines, the complexities of TV restoration presented unique challenges due to high voltages and vacuum hazards within the glass picture tubes. A search for modern literature on TV restoration yielded no results, leading to a study of old 1950s TV repair manuals. Understanding the technical language improved with repeated readings from different authors. A visit to the main library provided access to the Sams-Photofact for the specific TV model, which includes wiring diagrams and servicing information, crucial for the restoration process. The TV consists of three main components: the picture tube, the tuner, and the metal chassis, which houses the tubes, wires, resistors, and capacitors necessary for electron flow. In this particular model, the picture tube is supported by brackets within the wooden cabinet, allowing for easier chassis removal without detaching the picture tube, resulting in a lighter and more manageable component. After disconnecting the wires from the picture tube socket, yoke, and speaker, the supporting bolts were removed, and the chassis was extracted from the back. The chassis, post-restoration, shows minimal external differences from the pre-restoration version, aside from a significant accumulation of dirt and dust.
The restoration of vintage televisions involves a detailed understanding of their circuitry and components. The Variac is a critical tool in this process, allowing for controlled voltage application, which is essential for safely reviving dormant electronic devices. It is important to monitor the device closely during this initial power-up phase to prevent damage from potential electrical faults.
The construction of a vintage TV is intricate; the picture tube serves as the display mechanism, converting electrical signals into visual images, while the tuner selects the desired broadcast frequency. The metal chassis is the heart of the television, containing various electronic components including vacuum tubes, which amplify signals, and capacitors that filter and stabilize voltage levels.
The Sams-Photofact is an invaluable resource, providing schematics that detail the connections and functions of each component within the TV. This documentation is essential for troubleshooting and repairing specific issues that may arise during the restoration process.
When extracting the chassis, attention must be paid to the delicate nature of the picture tube and its connections. Careful disconnection of wires and removal of supporting structures is necessary to avoid damage. The restoration process may also involve cleaning components, replacing worn-out parts, and ensuring all connections are secure to restore the television to working condition.
Overall, restoring a vintage television is a meticulous task that requires patience, a solid understanding of electronics, and respect for the inherent dangers associated with high-voltage equipment.One thing your not suppose to do to an old radio or TV that hasn`t been run for many years is just go and plug the thing in and flip the power switch on. The best thing to do is use a device called a Variac which allows you to slowly bring up the power to a full 120 volts over the course of many hours, sometimes days.
You start it out about 20 volts and every few hours up the control dial another 10 volts or so and watch for any adverse reactions (you know, adverse like smoke, fire, explosions, etc) until you reach a full 120 volts, just like normal house voltage. But I noticed that this TV was already plugged in, so I assumed that someone else has already tried it out at the sale today, I decided to just let it rip.
After warming up a minute the TV came alive with near perfect sound and a very blurry, rolling, out of sync picture. Well that`s a good sign, at least the picture tube worked. I figured it would be a fun new learning experience; I always wanted to know how a TV set worked and now was my chance.
I bought the set for $30 and schlepped it home. I have restored over fifty vintage washing machines, but TV`s were a completely different animal with more hazards involved like extremely high voltage and dangerously high vacuums inside the glass picture tubes, so I needed to be sure about what I was doing. I searched for a modern book on how to restore old television sets, but like appliances, found nothing that been written on the subject, so I spent the next few weeks reading all the old 1950`s TV repair books I could find.
At first, I only understood about one out of every ten words in these highly technical books, but as I read the same thing written by different authors, who told the same story a slightly different way, it all started to make a little more sense. I also went downtown to the main library to get a copy of the Sams-Photofact, for my particular TV, which is a document of the wiring/circuit schematic and special servicing information.
Unlike washers or other types of major appliances, post-war radio and TV service information was well documented, for each major brand/model, by the Sams Company. Without this very specific circuit information it would have been impossible for me to get very far with this project.
I was eager to begin, so I removed the back and started to study the make-up of my new TV. There are three main parts to a vintage TV, the picture tube, the tuner and the metal chassis. The chassis contains all the tubes, wires, resistors, capacitors, etc. that allow the flow of electrons through the system. In this particular television, the picture tube is supported by brackets directly inside the wood cabinet, with many other TV`s the picture tube is supported and connected directly to the chassis. This means that I was able to remove the chassis without having to remove the picture tube so the chassis would be much lighter and less bulky to move.
I unplugged all the wires from the picture tube socket, yoke and speaker, removed the supporting bolts from underneath and pulled out the chassis from the back. Here is the chassis pulled out (post-restoration), although the top section doesn`t look that much different from the pre-restoration version, except it was filthy with dirt and dus
The restoration of vintage televisions involves a detailed understanding of their circuitry and components. The Variac is a critical tool in this process, allowing for controlled voltage application, which is essential for safely reviving dormant electronic devices. It is important to monitor the device closely during this initial power-up phase to prevent damage from potential electrical faults.
The construction of a vintage TV is intricate; the picture tube serves as the display mechanism, converting electrical signals into visual images, while the tuner selects the desired broadcast frequency. The metal chassis is the heart of the television, containing various electronic components including vacuum tubes, which amplify signals, and capacitors that filter and stabilize voltage levels.
The Sams-Photofact is an invaluable resource, providing schematics that detail the connections and functions of each component within the TV. This documentation is essential for troubleshooting and repairing specific issues that may arise during the restoration process.
When extracting the chassis, attention must be paid to the delicate nature of the picture tube and its connections. Careful disconnection of wires and removal of supporting structures is necessary to avoid damage. The restoration process may also involve cleaning components, replacing worn-out parts, and ensuring all connections are secure to restore the television to working condition.
Overall, restoring a vintage television is a meticulous task that requires patience, a solid understanding of electronics, and respect for the inherent dangers associated with high-voltage equipment.One thing your not suppose to do to an old radio or TV that hasn`t been run for many years is just go and plug the thing in and flip the power switch on. The best thing to do is use a device called a Variac which allows you to slowly bring up the power to a full 120 volts over the course of many hours, sometimes days.
You start it out about 20 volts and every few hours up the control dial another 10 volts or so and watch for any adverse reactions (you know, adverse like smoke, fire, explosions, etc) until you reach a full 120 volts, just like normal house voltage. But I noticed that this TV was already plugged in, so I assumed that someone else has already tried it out at the sale today, I decided to just let it rip.
After warming up a minute the TV came alive with near perfect sound and a very blurry, rolling, out of sync picture. Well that`s a good sign, at least the picture tube worked. I figured it would be a fun new learning experience; I always wanted to know how a TV set worked and now was my chance.
I bought the set for $30 and schlepped it home. I have restored over fifty vintage washing machines, but TV`s were a completely different animal with more hazards involved like extremely high voltage and dangerously high vacuums inside the glass picture tubes, so I needed to be sure about what I was doing. I searched for a modern book on how to restore old television sets, but like appliances, found nothing that been written on the subject, so I spent the next few weeks reading all the old 1950`s TV repair books I could find.
At first, I only understood about one out of every ten words in these highly technical books, but as I read the same thing written by different authors, who told the same story a slightly different way, it all started to make a little more sense. I also went downtown to the main library to get a copy of the Sams-Photofact, for my particular TV, which is a document of the wiring/circuit schematic and special servicing information.
Unlike washers or other types of major appliances, post-war radio and TV service information was well documented, for each major brand/model, by the Sams Company. Without this very specific circuit information it would have been impossible for me to get very far with this project.
I was eager to begin, so I removed the back and started to study the make-up of my new TV. There are three main parts to a vintage TV, the picture tube, the tuner and the metal chassis. The chassis contains all the tubes, wires, resistors, capacitors, etc. that allow the flow of electrons through the system. In this particular television, the picture tube is supported by brackets directly inside the wood cabinet, with many other TV`s the picture tube is supported and connected directly to the chassis. This means that I was able to remove the chassis without having to remove the picture tube so the chassis would be much lighter and less bulky to move.
I unplugged all the wires from the picture tube socket, yoke and speaker, removed the supporting bolts from underneath and pulled out the chassis from the back. Here is the chassis pulled out (post-restoration), although the top section doesn`t look that much different from the pre-restoration version, except it was filthy with dirt and dus
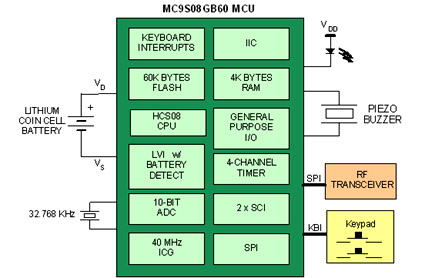
How to extend the battery life of your microcontroller based design
Battery-powered devices, such as electric toothbrushes, shavers, cell phones, PDAs, MP3 players, and remote controls, are integral to daily life. Consequently, power management has become a critical consideration for embedded designers. Microcontrollers (MCUs) provide various methods for managing power requirements...

Power Switch/Dimmer
This line voltage power controller connects a DC control voltage or microprocessor logic output to an AC load. By adding a filter capacitor to the input resistors, the circuit can be controlled by a duty-cycle modulated square wave with approximately...

Bridge voltage regulator circuit diagram using the
The circuit depicted in Figures A, B, and C demonstrates a high voltage coefficient. When the regulator resistance \( r_z \) is held constant, the bridge configuration achieves an infinite voltage coefficient. In Figure A, the load circuit is connected...
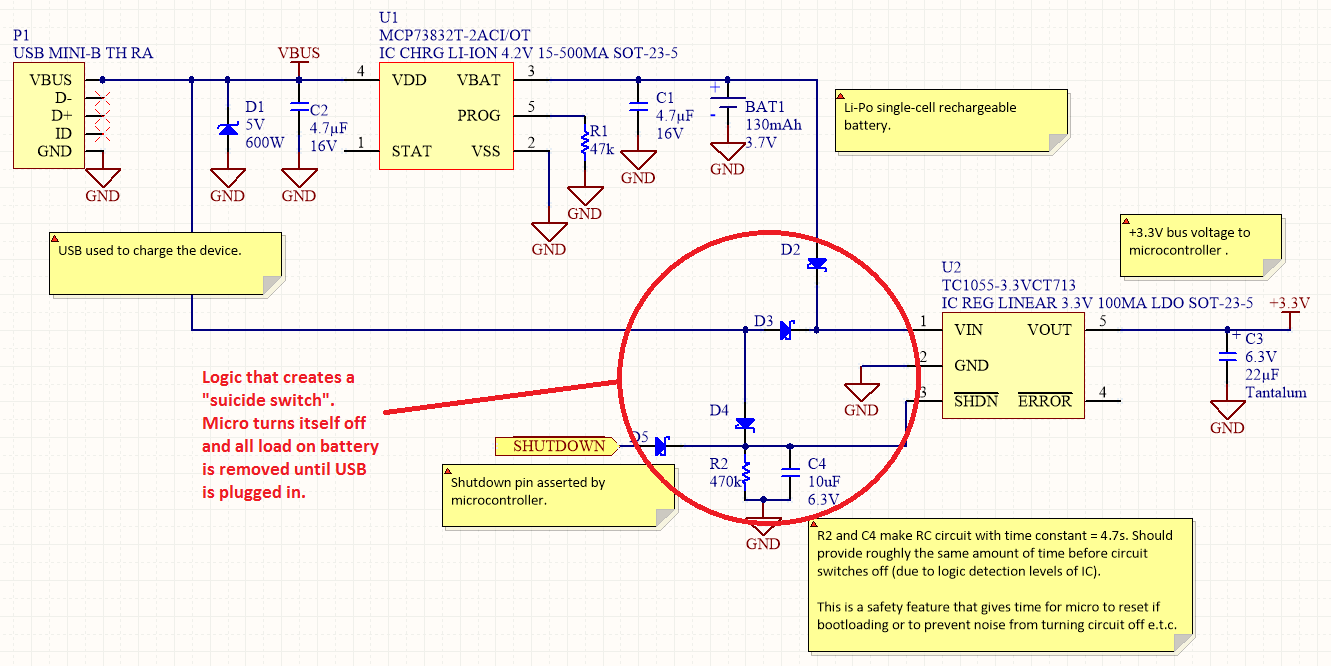
Power Management
Overview Disabling Sections of a Circuit The "Suicide Switch" Overview Power management is a significant design consideration for battery-powered devices.
Power management is a crucial aspect of circuit design, particularly in battery-powered applications where energy efficiency directly impacts the operational lifespan...

Test Bench Power Supply Schematic
This power supply circuit operates using 120 volts from household mains and should only be undertaken by individuals with the appropriate knowledge and skills to safely construct such a project. Failure to do so may result in personal injury or...

variable voltage and current power supply
An alternative method for utilizing operational amplifiers (op-amps) to regulate a power supply is illustrated below. The power transformer necessitates an additional winding to provide the op-amps with a bipolar voltage of +/- 8 volts. This negative voltage is also...

100v / 10ma regulator circuit
The circuit features no-load and short circuit protection mechanisms. To accommodate short circuit conditions, it is necessary to increase resistors R1 and R2 to allow for power dissipation; for example, R1 can be set to 1.2kΩ with a power rating...

psu
The Chameleon II Power Supply Circuits convert the raw input supply into stable voltage outputs necessary for the Chameleon interfaces. The outputs provided are +5V, +12V, and -12V.
The Chameleon II Power Supply Circuits are designed to ensure reliable operation of...

Regulator circuit silicon resistor formed
The simple voltage regulator circuit consists of a silicon regulator and a resistor. It is designed to rectify and filter DC voltage, as illustrated in the accompanying figure. The voltage regulator is connected in parallel with the load, and the...