


Puxing 777 Radio Headset Schematic
#puxing 777
#headset
#microphone
#speaker
#transmit button
#reverse-engineering
#communication
#wireless
#audio
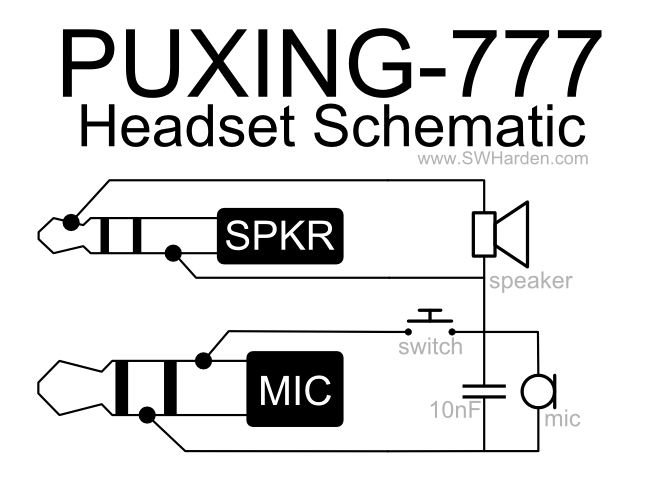
Description: A speaker, microphone, and transmit button circuit designed for the Puxing 777 radio, which is likely compatible with all Puxing radios. The circuit was reverse-engineered from an earphone/microphone headset that originally accompanied the radio to understand its functionality. The circuitry was successfully reconstructed, allowing the handheld radio to remain in its charger while enabling casual listening and transmission through a custom button, eliminating the need to awkwardly press the transmit button on the radio. The microphone utilized is a standard 20-cent electret type, and the speaker is a conventional 8-ohm loudspeaker, both without special modifications. A keyboard-style push-to-talk switch is incorporated, and a capacitor rated at 10nF is included in the design. The ultimate goal is to enhance a low-cost handheld VHF radio into an efficient desktop transceiver by integrating it with a quality antenna positioned at a height of 30 feet on a balcony, along with user-friendly switches, buttons, a microphone, and a speaker on a desktop panel.
The circuit comprises several key components that work together to facilitate audio input and output, as well as transmission capabilities. The electret microphone is connected to a pre-amplifier circuit, which boosts the weak audio signal generated by the microphone before it is sent to the radio for transmission. This ensures that the audio quality is maintained and that the transmitted signal is clear. The 8-ohm loudspeaker is wired to the audio output of the radio, allowing the user to hear incoming communications.
The push-to-talk switch is a crucial component that allows the user to control when the radio is in transmit mode. When pressed, this switch connects the microphone to the radio's transmission circuit, enabling the user to communicate. The capacitor (10nF) serves a filtering purpose, smoothing out any voltage fluctuations that may occur during operation, which helps to prevent distortion in the audio signal.
The design is compact and suitable for desktop use, making it convenient for users who prefer to have a more stationary setup rather than relying on handheld operation. By positioning the radio on a charger while using the custom circuit, the user can ensure that the device remains powered and ready for use without the hassle of frequent battery changes.
The overall integration of these components aims to create a reliable and efficient communication system that enhances the functionality of the Puxing 777 radio. With further refinements and potential improvements, such as better audio processing or additional features, this circuit can serve as a foundation for creating a versatile desktop transceiver setup.A speaker/microphone/transmit button circuit for the puxing 777 which probably works for all puxing radios. I decided to reverse-engineering an earphone/microphone headset that came with the radio to determine how it worked.
I can`t claim that I`m an expert in electronics theory, but I can say that I faithfully rebuilt the circuitry within the factory-shipped headset and it worked. The result allows me to leave my handheld radio in its charger while casually listening/transmitting with a button that I made instead of having to reach around and awkwardly squeeze the transmit button on the side of the radio. Once again, I built this circuit and it was successful for me, but there may still be a better way to do it.
The microphone is a 20-cent electret microphone with no special modifications. The speaker I used is a standard 8ohm loudspeaker with no special modifications. The switch is a keyboard-style (push-to-talk) switch, and the capacitor I used is good for 10nF. If you have any ideas for improvements, let me know! I`ll post some photos once I have my completed little base station set up. My ultimate goal is to turn an el-cheapo handheld VHF radio into a decent desktop transceiver by combining it with a nice antenna (located on a balcony at 30ft) and a convenient, easy-to-use switches/buttons/microphone/speaker/etc on a desktop panel. Scott Harden has had a lifelong passion for computer programming and electrical engineering, and recently has become interested in its relationship with biomolecular sciences.
He has run a personal website since he was 15, which has changed names from HardenTechnologies. com, to KnightHacker. com, to ScottIsHot. com, to its current SWHarden. com. Scott has been in college for 10 years, with 3 more years to go. He has an AA in Biology (Valencia College), BS in Cell Biology (Union University), MS in Molecular Biology and Microbiology (University of Central Florida), and is currently in a combined DMD (doctor of dental medicine) / PhD (neuroscience) program through the collaboration of the College of Dentistry and College of Medicine (Interdisciplinary Program in Biomedical Science, IDP) at the University of Florida in Gainesville, Florida. In his spare time Scott builds small electrical devices (with an emphasis on radio frequency) and enjoys writing cross-platform open-source software.
The circuit comprises several key components that work together to facilitate audio input and output, as well as transmission capabilities. The electret microphone is connected to a pre-amplifier circuit, which boosts the weak audio signal generated by the microphone before it is sent to the radio for transmission. This ensures that the audio quality is maintained and that the transmitted signal is clear. The 8-ohm loudspeaker is wired to the audio output of the radio, allowing the user to hear incoming communications.
The push-to-talk switch is a crucial component that allows the user to control when the radio is in transmit mode. When pressed, this switch connects the microphone to the radio's transmission circuit, enabling the user to communicate. The capacitor (10nF) serves a filtering purpose, smoothing out any voltage fluctuations that may occur during operation, which helps to prevent distortion in the audio signal.
The design is compact and suitable for desktop use, making it convenient for users who prefer to have a more stationary setup rather than relying on handheld operation. By positioning the radio on a charger while using the custom circuit, the user can ensure that the device remains powered and ready for use without the hassle of frequent battery changes.
The overall integration of these components aims to create a reliable and efficient communication system that enhances the functionality of the Puxing 777 radio. With further refinements and potential improvements, such as better audio processing or additional features, this circuit can serve as a foundation for creating a versatile desktop transceiver setup.A speaker/microphone/transmit button circuit for the puxing 777 which probably works for all puxing radios. I decided to reverse-engineering an earphone/microphone headset that came with the radio to determine how it worked.
I can`t claim that I`m an expert in electronics theory, but I can say that I faithfully rebuilt the circuitry within the factory-shipped headset and it worked. The result allows me to leave my handheld radio in its charger while casually listening/transmitting with a button that I made instead of having to reach around and awkwardly squeeze the transmit button on the side of the radio. Once again, I built this circuit and it was successful for me, but there may still be a better way to do it.
The microphone is a 20-cent electret microphone with no special modifications. The speaker I used is a standard 8ohm loudspeaker with no special modifications. The switch is a keyboard-style (push-to-talk) switch, and the capacitor I used is good for 10nF. If you have any ideas for improvements, let me know! I`ll post some photos once I have my completed little base station set up. My ultimate goal is to turn an el-cheapo handheld VHF radio into a decent desktop transceiver by combining it with a nice antenna (located on a balcony at 30ft) and a convenient, easy-to-use switches/buttons/microphone/speaker/etc on a desktop panel. Scott Harden has had a lifelong passion for computer programming and electrical engineering, and recently has become interested in its relationship with biomolecular sciences.
He has run a personal website since he was 15, which has changed names from HardenTechnologies. com, to KnightHacker. com, to ScottIsHot. com, to its current SWHarden. com. Scott has been in college for 10 years, with 3 more years to go. He has an AA in Biology (Valencia College), BS in Cell Biology (Union University), MS in Molecular Biology and Microbiology (University of Central Florida), and is currently in a combined DMD (doctor of dental medicine) / PhD (neuroscience) program through the collaboration of the College of Dentistry and College of Medicine (Interdisciplinary Program in Biomedical Science, IDP) at the University of Florida in Gainesville, Florida. In his spare time Scott builds small electrical devices (with an emphasis on radio frequency) and enjoys writing cross-platform open-source software.

Audio Oscillators
The discussion has focused on oscillators that utilize L-C tuned circuits, which create a 180° phase shift due to inductive or capacitive coupling, in addition to another 180° phase shift produced by the transistor itself. These L-C oscillators are widely...

Dynamic Microphone Preamp
This circuit amplifies the output from a 150-ohm dynamic microphone to line level using an instrumentation amplifier. Instrumentation amplifiers are similar to operational amplifiers (op-amps) but offer adjustable gain and improved common-mode rejection. They provide high gain, high precision, low...

HA13118 IC For 18W Car Stereo Amplifier
This is a Class AB audio power amplifier utilizing the Hitachi HA13118 module, suitable for car applications. It can also be used in various other settings.
The Class AB audio power amplifier is designed to deliver high-quality sound reproduction while maintaining...
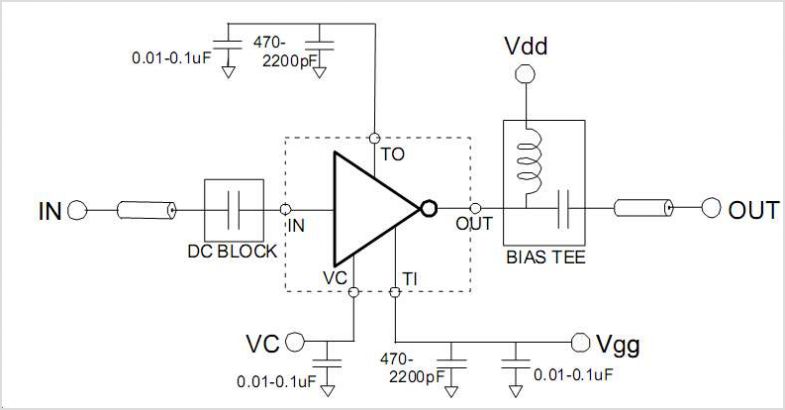
KGA8010 Ultra Broadband Distributed Amplifier
The KIA6924S is designed to mute the popping sound produced when turning ON or OFF receivers, pre-amplifiers, main amplifiers, and other electronic audio equipment, as well as to eliminate noise generated during switch transitions. Manufactured by Korea Electronics (KEC).
The...
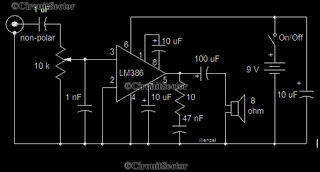
Simple Audio Amplifier Circuit Using LM386 PCB
This is a simple low-power audio amplifier circuit capable of producing a power output of 1W. The mono amplifier circuit is built around the LM386 integrated circuit, which operates effectively at low voltages, even below 9V. This low-voltage amplifier is...

Car wireless alarm
This FM radio-controlled anti-theft alarm can be used with any vehicle having a 6- to 12-volt DC supply system. The mini VHF, FM transmitter is fitted in the vehicle at night when it is parked in the car porch or...

2W audio power amplifier LM380 circuit
This document details a 2W audio power amplifier circuit that utilizes a 14-pin LM380 package as the amplification element. The input signal is managed by a volume control potentiometer (Rp) rated at 20k ohms, with a coupling capacitance of 22...

Circuit Project: Small Audio Amplifiers Using LM386 and NE5534
Approximately one watt RMS appears to be a suitable output level, which is also the maximum power that a basic amplifier powered by 12V can deliver to an 8 Ohm speaker. A very low saturation amplifier may reach up to...

microphone beyerdynamic TG X 50 Mk II
The Mk II was a second-generation version of the TG X 50. Both were dynamic microphones intended for bass instruments and kick drums. The primary difference between the two versions was the introduction of a passive EQ filter in the...