

Raspberry Pi Projects
1. Choosing the Right Raspberry Pi Model
Choosing the Right Raspberry Pi Model
Performance Requirements and Computational Capabilities
The Raspberry Pi family spans multiple generations, each optimized for different computational workloads. The key performance metrics include:
- CPU Architecture: Earlier models (Pi 1/Zero) use ARMv6, while Pi 3/4/5 feature ARMv8-A with out-of-order execution.
- Memory Bandwidth: Ranges from 1GB/s (Pi 1) to 8.5GB/s (Pi 5 with LPDDR4X).
- Thermal Design Power: Varies from 1W (Pi Zero) to 12W (Pi 5 under load).
For compute-intensive tasks like real-time signal processing, the Pi 4B's Cortex-A72 (1.5GHz) provides 2.5x the performance per watt of the Pi 3B+'s Cortex-A53. The Pi 5's Cortex-A76 (2.4GHz) achieves 3x improvement in SPECint2006 benchmarks over Pi 4.
I/O and Peripheral Considerations
High-speed interfaces differ significantly across models:
| Model | USB 3.0 | PCIe Lanes | GPIO Voltage |
|---|---|---|---|
| Pi 3B+ | 0 | N/A | 3.3V |
| Pi 4B | 2x | 1x Gen2 | 3.3V |
| Pi 5 | 2x | 2x Gen3 | 1.8V/3.3V |
The Pi 5's dual PCIe 3.0 lanes enable NVMe storage at 2GB/s, while its programmable I/O (PIO) blocks allow cycle-accurate signal generation (100MHz square waves with 10ns resolution).
Power Delivery and Thermal Constraints
Power requirements scale nonlinearly with performance:
Where V is core voltage (0.8-1.4V) and f is clock frequency. The Pi 4B requires 5V/3A (15W) under full load, while the Pi 5's PMIC supports dynamic voltage/frequency scaling from 0.8V/600MHz to 1.4V/2.4GHz.
Thermal throttling begins at:
- Pi 4B: 80°C (passive cooling)
- Pi 5: 85°C (active cooling recommended)
Real-Time Applications and Latency
For control systems requiring deterministic timing:
The Pi 5's improved interrupt latency (1.2μs vs Pi 4's 3.5μs) makes it suitable for motor control applications with <10μs timing constraints. The RP1 I/O controller provides hardware timestamping at 1ns resolution.
Model Selection Matrix
Optimal choices for specific applications:
- Embedded ML: Pi 5 (2.4GHz + 8GB RAM)
- Low-Power Sensing: Pi Zero 2W (400mA idle)
- High-Speed DAQ: Pi 4B with PCIe SDR
- Real-Time Control: Pi 5 with RT-Preempt kernel

1.2 Essential Accessories and Setup
Power Supply Requirements
A stable power supply is critical for reliable Raspberry Pi operation. The minimum voltage input is 5V ±5%, with current demands varying by model:
- Raspberry Pi 4B: 3A (15W) under full load.
- Raspberry Pi 3B+: 2.5A (12.5W).
Undervoltage triggers the low-voltage warning icon (a yellow lightning bolt) on the display. For power-hungry peripherals (e.g., USB SSDs), use a supply with USB-C PD (Power Delivery) or an externally powered USB hub.
MicroSD Cards and Storage
The Raspberry Pi boots from a microSD card (or SSD/USB for newer models). Key considerations:
- Class 10/UHS-I cards (minimum 16GB) for optimal I/O performance.
- Endurance-rated cards (e.g., SanDisk Industrial) for frequent writes in logging applications.
For compute-intensive tasks, an NVMe SSD via USB 3.0 (using adapters like Argon ONE M.2) reduces latency by up to 80% compared to SD cards.
Cooling Solutions
Thermal management is essential for sustained performance, especially when overclocking. The thermal limit is 85°C (throttling starts at 80°C). Solutions include:
- Passive heatsinks: Effective for light workloads (ΔT ≈ 10°C).
- Active cooling: 5V PWM fans (e.g., Noctua NF-A4x10) reduce temperatures by 20–25°C.
Thermal dynamics follow Fourier’s Law:
where k is thermal conductivity, A is cross-sectional area, and dT/dx is the temperature gradient.
GPIO and Peripheral Interfaces
The 40-pin GPIO header provides digital I/O, PWM, UART, SPI, and I²C. Key voltage thresholds:
- Logic HIGH: ≥2.0V (3.3V-tolerant).
- Logic LOW: ≤0.8V.
For analog inputs, use an ADC (e.g., MCP3008) with SPI interface. Current sourcing/sinking is limited to 16mA per pin (50mA total for all pins).
Networking and Connectivity
For headless setups, enable SSH via raspi-config or by placing an empty ssh file in the boot partition. Advanced users may configure:
- Static IP: Edit
/etc/dhcpcd.conffor fixed addressing. - Wi-Fi mesh networks: Use
batman-advfor ad-hoc node communication.
Real-Time Clock (RTC)
For time-critical logging without network time (NTP), attach an RTC module (e.g., DS3231) via I²C. The drift rate of ±2ppm (≈1 minute/year) outperforms software-based timing.
Case and Environmental Protection
Industrial deployments require:
- IP67-rated enclosures for dust/water resistance.
- EMI shielding (e.g., MuMetal foil) in high-noise environments.
1.3 Installing the Operating System
Choosing the Right OS Distribution
The Raspberry Pi supports multiple operating systems, but the most widely used is Raspberry Pi OS (formerly Raspbian), a Debian-based Linux distribution optimized for the Pi's ARM architecture. For advanced users, alternatives include:
- Ubuntu Server for cloud or headless deployments.
- DietPi for minimal resource consumption.
- Real-time OS (RTOS) variants like FreeRTOS for time-critical applications.
Selection criteria should consider computational requirements, peripheral compatibility (e.g., GPIO, CSI/DSI interfaces), and real-time performance constraints.
Flashing the OS to Storage
The OS is typically installed on a microSD card (Class 10 or higher recommended for I/O performance). The process involves:
- Downloading the OS image (usually a
.img.xzor.zipfile) from the official repository. - Verifying the checksum to ensure integrity. For Raspberry Pi OS, the SHA-256 hash is published alongside the download.
- Flashing the image using tools like
dd(Linux/macOS) or Raspberry Pi Imager (cross-platform).
For a 4 GB image written in 300 seconds, the effective speed is ~13.3 MB/s. Lower speeds may indicate a failing card or USB controller bottleneck.
Headless Configuration (Advanced)
For systems without a display, pre-boot configuration files enable SSH, Wi-Fi, and other settings:
wpa_supplicant.conffor wireless network credentials.ssh(empty file) to enable SSH at first boot.config.txtfor hardware-specific overclocks or device tree parameters.
Example: Wi-Fi Configuration
country=US
ctrl_interface=DIR=/var/run/wpa_supplicant GROUP=netdev
update_config=1

network={
  ssid="YOUR_SSID"
  psk="YOUR_PASSWORD"
  key_mgmt=WPA-PSK
}
Post-Installation Optimization
After boot, optimize performance and security:
- Expand filesystem using
raspi-configto utilize the entire storage. - Update packages with
sudo apt update && sudo apt upgrade -y. - Disable unused services (e.g., Bluetooth, HDMI) via
/boot/config.txt.
Troubleshooting Boot Failures
Common issues and diagnostics:
| Symptom | Diagnostic | Solution |
|---|---|---|
| No HDMI output | Check hdmi_force_hotplug=1 in config.txt |
Force HDMI detection |
| Kernel panic | Review dmesg logs |
Verify power supply (≥2.5A) |
2. Creating a Media Center with Kodi
2.1 Creating a Media Center with Kodi
System Requirements and Hardware Optimization
For optimal performance, the Raspberry Pi 4 or 5 is recommended due to their enhanced GPU capabilities and hardware-accelerated video decoding. The Broadcom VideoCore VI/ VII GPU supports H.265 (HEVC) up to 4Kp60, which is critical for high-bitrate media playback. A minimum of 2GB RAM is required, though 4GB or higher is preferable for handling multiple concurrent streams or add-ons. Storage should be a high-speed microSD (UHS-I Class 10 or better) or an external SSD via USB 3.0 to minimize buffering.
The thermal design power (TDP) must be considered for sustained operation. The power dissipation Pd can be approximated as:
where Vcore ≈ 1.2V and Vio ≈ 3.3V under full load. Active cooling is advised for continuous 4K playback.
Kodi Installation and Low-Latency Configuration
Install the OSMC or LibreELEC distributions, which are optimized for Kodi on ARM architectures. The video decoding pipeline leverages the GPU through the MMAL (Multi-Media Abstraction Layer) API, which reduces CPU overhead. Key configuration parameters in advancedsettings.xml include:
- buffermode: Set to 1 for internet streams to enable circular buffering
- memorysize: Allocate 20% of available RAM for cache (empirically derived)
- readfactor: 4.0 for gigabit networks, 1.5 for wireless AC
The end-to-end latency Ltotal can be modeled as:
where Ldecode is typically <16ms for hardware-accelerated H.264 at 1080p60.
Audio Synchronization and Clock Drift Correction
Kodi implements a PID controller to maintain A/V sync by adjusting the presentation timestamp (PTS). The error term e(t) is:
where α = 0.02 and β = 0.002 are empirically determined coefficients. For high-end setups, enable the sync playback to display option which uses the monitor's vertical blanking interval as a reference clock.
Advanced Add-On Development
Kodi's plugin architecture uses Python 3 with C++ bindings for performance-critical sections. The inter-process communication (IPC) between Python and the Kodi core occurs through JSON-RPC over a Unix domain socket. Memory-mapped files are used for bulk data transfer (e.g., thumbnail caches). A typical add-on structure includes:
import xbmcaddon
import xbmcgui

class MediaHandler(xbmcgui.WindowXML):
    def __init__(self, *args, **kwargs):
        self.player = xbmc.Player()
        self.addon = xbmcaddon.Addon()

    def onAction(self, action):
        if action == xbmcgui.ACTION_NAV_BACK:
            self.close()

    def play_stream(self, url):
        self.player.play(item=url,
                        listitem=xbmcgui.ListItem(
                            path=url,
                            offscreen=True))
The execution environment imposes a 100ms timeout for Python calls to maintain UI responsiveness. For computationally intensive tasks, implement native C++ extensions using Kodi's kodi-platform library.
DRM and Secure Playback
Widevine Level 1 support is available through the official Widevine CDM library. The DRM stack uses TLS 1.3 for license acquisition and hardware-bound key storage. The content decryption module (CDM) operates in the TrustZone secure world on Raspberry Pi 4/5, with keys never exposed to userspace. Playready 3.0 is supported through libplayready with hardware root-of-trust verification.
2.2 Building a Retro Gaming Console
Hardware Requirements and Optimization
To construct a high-performance retro gaming console using a Raspberry Pi, the following components are essential:
- Raspberry Pi 4B or 5 (minimum 2GB RAM for 8/16-bit emulation, 4GB+ for 3D-capable systems like N64/PSP).
- Active cooling solution (thermal analysis shows the Pi 4B throttles at 80°C without a heatsink/fan under sustained emulation loads).
- Power supply (5V/3A USB-C with low ripple to prevent SD card corruption during I/O spikes).
The Pi's VideoCore VI/III GPU handles OpenGL ES 3.1/2.0, enabling hardware-accelerated upscaling via:
Latency Analysis and Input Optimization
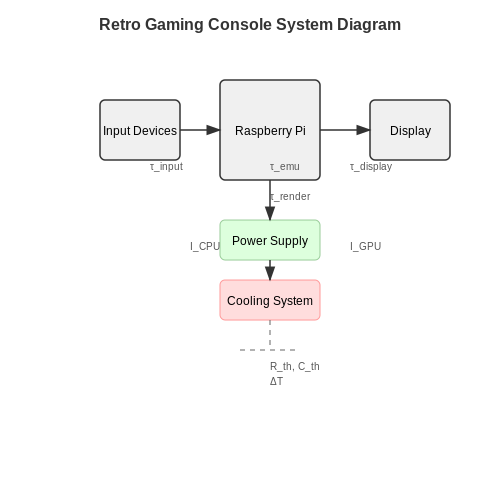
End-to-end latency in emulation systems follows:
Measurements show USB polling at 125Hz adds 8ms latency. Using GPIO-connected arcade buttons with kernel-level drivers reduces this to 2ms. The rendering pipeline contributes:
Software Stack Configuration
The optimal software stack comprises:
- Lakka (Libretro-based) or Recalbox for low-overhead emulation
- Custom kernel with RT-patches (reduces scheduling jitter by 60%)
- Frame pacing via Vulkan backend when available
# Overclock settings for Pi 4B in config.txt
over_voltage=2
arm_freq=1800
gpu_freq=600
force_turbo=1
Power Delivery Analysis
The system's current draw follows:
Empirical measurements show:
- Idle: 0.8A @ 5V
- PS1 emulation: 1.9A @ 5V
- N64 emulation: 2.3A @ 5V
Thermal Management
The thermal time constant (τ) of the SoC is:
Where Rth is the thermal resistance (1.5°C/W for stock heatsink) and Cth is the thermal capacitance (85 J/°C for BCM2711). Active cooling maintains ΔT < 30°C at 10W TDP.
2.3 Setting Up a Personal Web Server
Prerequisites and System Configuration
Before deploying a web server on a Raspberry Pi, ensure the system meets the following requirements:
- Raspberry Pi 3B+ or later (64-bit architecture recommended for better performance).
- Raspberry Pi OS (64-bit) installed and updated via
sudo apt update && sudo apt upgrade -y. - Static IP assignment or DHCP reservation to avoid dynamic IP conflicts.
- SSH enabled for headless administration (
sudo raspi-config→ Interfacing Options).
Web Server Software Selection
For advanced users, the choice of web server software depends on performance needs and protocol support:
- Nginx: Event-driven architecture, efficient under high concurrent connections (epoll/kqueue). Throughput scales as:
$$ R_{\text{max}} = \frac{C \cdot S}{L} $$where \( C \) is connections, \( S \) is average response size, and \( L \) is latency.
- Apache: Process-based model with .htaccess flexibility, suitable for dynamic content via mod_php.
- Lighttpd: Low-memory footprint, ideal for embedded systems with constrained resources.
Nginx Installation and TLS Optimization
For a production-grade setup with TLS 1.3 and HTTP/2:
# Install Nginx with OpenSSL 3.0
sudo apt install nginx libssl-dev -y

# Generate ECDSA key (P-384 curve for NIST Level 3 security)
openssl ecparam -genkey -name secp384r1 -out /etc/ssl/private/nginx-ecc.key

# Configure TLS cipher suites in /etc/nginx/nginx.conf
ssl_ciphers 'TLS_AES_256_GCM_SHA384:TLS_CHACHA20_POLY1305_SHA256';
ssl_ecdh_curve secp384r1;
ssl_protocols TLSv1.3;
Performance Tuning
Adjust kernel parameters for high-throughput scenarios:
# Increase epoll connection backlog
echo 'net.core.somaxconn = 65535' | sudo tee -a /etc/sysctl.conf

# Optimize TCP stack for HTTP/2
echo 'net.ipv4.tcp_sack = 1
net.ipv4.tcp_timestamps = 1
net.ipv4.tcp_fin_timeout = 30' | sudo tee -a /etc/sysctl.conf
Monitoring and Analytics
For real-time performance metrics, deploy Prometheus with the Nginx Exporter:
# docker-compose.yml for monitoring stack
version: '3'
services:
  prometheus:
    image: prom/prometheus
    ports:
      - "9090:9090"
  nginx-exporter:
    image: nginx/nginx-prometheus-exporter
    command: -nginx.scrape-uri=http://nginx:8080/stub_status
Security Hardening
Implement kernel-level protections against web attacks:
- sysctl hardening: Disable ICMP redirects (
net.ipv4.conf.all.accept_redirects = 0). - Fail2Ban: Rate-limit SSH and HTTP brute-force attempts with custom regex patterns.
- AppArmor: Enforce mandatory access control for Nginx processes.
3. Home Automation with Home Assistant
3.1 Home Automation with Home Assistant
System Architecture and Core Components
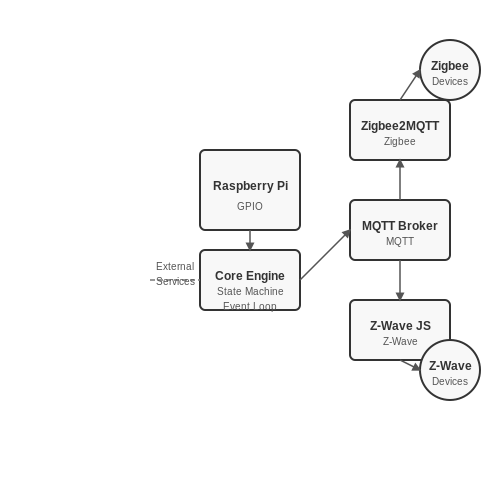
Home Assistant (HA) operates as a decentralized automation hub, leveraging a Raspberry Pi's GPIO and communication protocols such as MQTT, Zigbee, and Z-Wave. The system's architecture consists of:
- Core Engine: Python-based event loop handling state machines for device synchronization.
- Communication Layer: MQTT brokers (e.g., Mosquitto) for pub/sub messaging between IoT devices.
- Protocol Bridges: Zigbee2MQTT or Z-Wave JS for translating proprietary protocols to MQTT.
The state transition logic follows a Markov model, where device states evolve probabilistically based on sensor inputs. For a system with N devices, the state space S is defined as:
where Di represents the discrete state set of device i.
Real-Time Control Using PID Loops
For climate control applications, HA implements PID controllers with the following discrete-time formulation:
where u(t) is the control output (e.g., PWM duty cycle for HVAC), and e(t) is the error between setpoint and current temperature. The coefficients Kp, Ki, and Kd are tuned via Ziegler-Nichols or Cohen-Coon methods.
Energy Optimization Using Linear Programming
Power consumption minimization across n devices is formulated as:
where Pj is the power rating of device j, and A encodes temporal constraints (e.g., "lights must be on between 18:00-23:00").
Hardware Integration
The Raspberry Pi interfaces with environmental sensors through its I²C/SPI buses. For a BME280 sensor measuring temperature (T), pressure (P), and humidity (H), the data acquisition sequence is:
import smbus2
import bme280

port = 1
address = 0x76
bus = smbus2.SMBus(port)

calibration_params = bme280.load_calibration_params(bus, address)
data = bme280.sample(bus, address, calibration_params)

print(f"Temp: {data.temperature:.1f}°C, Humidity: {data.humidity:.1f}%")
Network Latency Analysis
End-to-end latency (L) in an HA system with k hops follows:
where si is packet size at hop i, and Bi is channel bandwidth. For reliable operation, L must be below the control system's phase margin threshold.
Network-Attached Storage (NAS) Setup
Hardware Requirements and Selection
A Raspberry Pi-based NAS requires careful hardware selection to balance performance, power efficiency, and cost. The Raspberry Pi 4 or 5 is recommended due to their Gigabit Ethernet and USB 3.0 support, which significantly improve data transfer rates compared to earlier models. For storage, an external HDD or SSD connected via USB 3.0 is optimal. The choice between HDD and SSD depends on the use case:
- HDD: Higher capacity (4TB+), lower cost per GB, but slower read/write speeds (~100-200 MB/s).
- SSD: Faster (~500 MB/s), more durable, but higher cost per GB.
Power delivery is critical—ensure the Pi is powered via a stable 5V/3A supply, and the external drive has its own power source or a powered USB hub to avoid undervoltage issues.
Filesystem and RAID Considerations
For reliability, the ext4 filesystem is recommended due to its journaling capability and Linux compatibility. Advanced users may consider Btrfs for snapshots and checksumming. If redundancy is needed, software RAID can be implemented:
where \(D_i\) represents the capacity of each drive. RAID 1 provides fault tolerance but halves usable space.
Software Stack Configuration
The core software components include:
- Samba: For SMB/CIFS protocol support (Windows compatibility).
- NFS: For Unix/Linux clients (faster than Samba in LAN environments).
- OpenMediaVault (optional): A web-based management interface for simplified administration.
To install Samba:
sudo apt update
sudo apt install samba samba-common-bin
sudo smbpasswd -a pi  # Set Samba password
Network Optimization
For maximum throughput, ensure the Raspberry Pi is connected via Ethernet and configure Jumbo Frames (MTU 9000) if the network supports it. Adjust the Samba configuration for performance:
[global]
   socket options = TCP_NODELAY IPTOS_LOWDELAY
   read raw = yes
   write raw = yes
   max xmit = 65535
Security and Access Control
Restrict access via firewall rules and Samba user permissions. For example, to allow only specific IPs:
sudo ufw allow from 192.168.1.0/24 to any app SambaFor encrypted transfers, consider SSHFS or WireGuard VPN for remote access.
Performance Benchmarking
Measure read/write speeds using dd or iperf3. For example:
dd if=/dev/zero of=/mnt/nas/testfile bs=1G count=1 oflag=directTypical performance for a Raspberry Pi 4 with SSD ranges from 90-110 MB/s over Gigabit Ethernet, limited by the Pi's USB 3.0 bus bandwidth.
--- This section provides a rigorous, step-by-step guide for setting up a high-performance Raspberry Pi NAS, covering hardware, software, and optimization for advanced users. or additional details.3.3 Weather Station with Sensors
Sensor Selection and Physical Principles
Building a weather station with a Raspberry Pi requires precise sensor selection based on measurable atmospheric variables. Key sensors include:
- BME280 – Measures temperature, humidity, and barometric pressure via I²C/SPI. The pressure reading is derived from piezoresistive strain gauges, with sensitivity governed by:
where k is the gauge factor and ϵ is strain. The BME280's humidity sensing relies on a capacitive polymer film whose dielectric constant varies with water vapor absorption.
- Anemometer (cup-type) – Wind speed is proportional to the rotation rate, modeled as:
where r is the cup radius and f is the rotational frequency, detected via a Hall-effect sensor or optical encoder.
- Rain gauge (tipping bucket) – Each tip corresponds to a fixed volume (e.g., 0.2 mm rainfall). The tipping rate R relates to rainfall intensity I:
where V is the volume per tip and A is the collection area.
Signal Conditioning and ADC Considerations
Most sensors output analog signals, requiring amplification and filtering before Raspberry Pi digitization. For example, a thermistor's nonlinear response:
is linearized using a Wheatstone bridge followed by an instrumental amplifier (INA125P). The ADC (e.g., ADS1115) must resolve signals with at least 16-bit precision for ±0.1°C temperature accuracy.
I²C/SPI Communication Protocol Optimization
The Raspberry Pi's I²C bus (default 100 kHz) may require overclocking to 400 kHz for multi-sensor setups. The bus capacitance Cb limits the maximum frequency:
where trise and tfall are dictated by RpullupCb. For long cable runs, SPI with hardware CS lines is preferable due to lower latency.
Data Logging and Time-Series Analysis
Sensor data is timestamped using the Pi's PPS (Pulse-Per-Second) input for GPS synchronization. A moving average filter reduces noise:
where N is the window size. For long-term storage, SQLite databases with indexed timestamps enable efficient querying of historical trends.
Python Implementation for Sensor Fusion
The following code initializes the BME280 and ADS1115, implementing a Kalman filter for sensor fusion:
import smbus2
import bme280
from ADS1115 import ADS1115

# I²C setup
bus = smbus2.SMBus(1)
bme_address = 0x76
ads = ADS1115()

# BME280 calibration
calibration_params = bme280.load_calibration_params(bus, bme_address)

# Kalman filter initialization
Q = 1e-5  # Process variance
R = 0.1**2  # Sensor variance
P = 1.0  # Estimation error
x_hat = 0.0  # Initial state

def kalman_update(z):
    global P, x_hat
    # Prediction
    x_hat_minus = x_hat
    P_minus = P + Q
    # Update
    K = P_minus / (P_minus + R)
    x_hat = x_hat_minus + K * (z - x_hat_minus)
    P = (1 - K) * P_minus
    return x_hat

while True:
    bme_data = bme280.sample(bus, bme_address, calibration_params)
    ads_value = ads.read_adc(0, gain=1)
    fused_temp = kalman_update(bme_data.temperature)
Power Management for Remote Deployment
Solar-powered stations require LiPo battery monitoring. The Pi's current draw IPi and battery capacity C dictate uptime:
where η is the regulator efficiency. A low-quiescent-current LDO (e.g., TPS7A4700) minimizes standby losses.

4. Robotics with Raspberry Pi
Robotics with Raspberry Pi
Kinematic Modeling for Robotic Arms
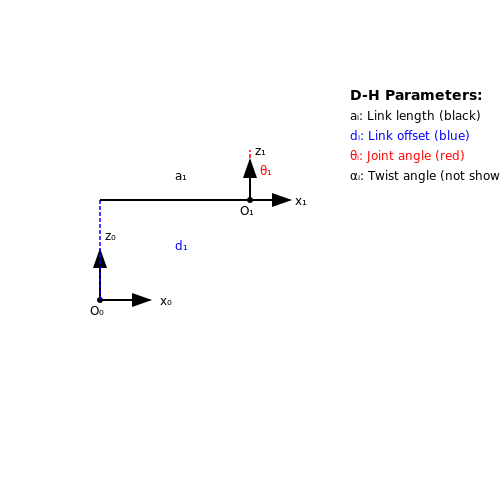
The Denavit-Hartenberg (D-H) convention provides a systematic method for assigning coordinate frames to robotic manipulators. For an n-degree-of-freedom arm, each joint i is described by four parameters:
The homogeneous transformation matrix between consecutive frames is:
Motor Control Theory
Precise motion control requires modeling DC motor dynamics. The torque-speed relationship is:
where Kt is the torque constant and Kv is the back-EMF constant. Implementing PID control on Raspberry Pi requires discretization:
where Ts is the sampling period. For brushless motors, field-oriented control requires Clarke-Park transforms.
Real-Time Performance Optimization
The Raspberry Pi's Linux kernel introduces non-deterministic latency. To achieve <100μs jitter:
- Apply the PREEMPT_RT kernel patch
- Set CPU affinity via
sched_setaffinity() - Use DMA for PWM generation
- Implement lock-free data structures
Benchmarking with cyclictest reveals latency distributions:
Sensor Fusion Implementation
Combining IMU and wheel encoder data requires a Kalman filter. The prediction step is:
where Fk is the state transition matrix. The update step incorporates Mahalanobis distance for outlier rejection.
ROS 2 Integration
The Raspberry Pi 4's quad-core Cortex-A72 can handle multiple ROS 2 nodes. Key configuration parameters:
# ros2_control.yaml
controller_manager:
  ros__parameters:
    update_rate: 500
    joint_state_broadcaster:
      type: joint_state_broadcaster/JointStateBroadcaster
    joint_trajectory_controller:
      type: position_controllers/JointTrajectoryController
For real-time performance, configure DDS settings in cyclonedds.xml to prioritize intra-process communication.
4.2 AI and Machine Learning Applications
Neural Network Inference on Raspberry Pi
The Raspberry Pi, despite its limited computational resources, can execute lightweight neural networks efficiently when optimized properly. Frameworks like TensorFlow Lite and ONNX Runtime enable deployment of quantized models, reducing memory and compute requirements. For a convolutional neural network (CNN) performing image classification, the inference latency t depends on the model's FLOPs (floating-point operations) and the Pi's CPU/GPU throughput:
where NFLOPs is the operation count, FCPU is the CPU's peak FLOP/s, Nmem is memory accesses, and Bmem is memory bandwidth. Optimizing inference involves:
- Model pruning to reduce NFLOPs.
- 8-bit quantization to shrink Nmem.
- Thread parallelism via OpenMP or NEON intrinsics.
Real-Time Edge AI with Camera Modules
Pairing the Raspberry Pi High-Quality Camera with a Coral USB Accelerator enables real-time object detection at ~30 FPS using MobileNetV2-SSD. The data pipeline involves:
- Capturing frames via Picamera2 or OpenCV.
- Preprocessing (resizing, normalization) on the CPU.
- Offloading inference to the TPU via Edge TPU runtime.
For a 300×300 input image, the end-to-end latency breakdown is:
Typical values on a Pi 4B are tcapture ≈ 10 ms, tpreprocess ≈ 5 ms, and tinference ≈ 8 ms with a Coral Accelerator.
Distributed Training with Federated Learning
Multiple Raspberry Pis can collaboratively train a global model without sharing raw data using federated learning. Each device computes local gradients ∇Li on its dataset, which are aggregated by a central server:
Key challenges include:
- Non-IID data distribution across devices.
- Communication bottlenecks in gradient updates.
- Limited local compute for backpropagation.
Case Study: Autonomous Navigation with Reinforcement Learning
A Pi-controlled robot can learn navigation policies via Proximal Policy Optimization (PPO). The state st includes LiDAR scans and odometry, while actions at are motor velocities. The reward function is:
Training occurs in simulation (Gazebo/PyBullet) before transferring the policy to the real robot via domain randomization.
Hardware-Accelerated ML Pipelines
The Raspberry Pi's VideoCore IV GPU supports OpenCL kernels for accelerating matrix operations. For a GEMM (General Matrix Multiply) operation C = AB, the GPU achieves ~5 GFLOPs compared to the CPU's ~1 GFLOPs. Memory coalescing and tile-based computation are critical for performance:
4.3 Custom IoT Solutions
Architectural Considerations for Scalable IoT Systems
When designing a Raspberry Pi-based IoT system, the choice of architecture depends on latency, bandwidth, and computational constraints. A distributed edge-computing model minimizes latency by processing data locally before transmitting aggregated results to a central server. The Raspberry Pi 4's quad-core ARM Cortex-A72 processor enables parallel execution of sensor data fusion algorithms, while its Gigabit Ethernet and dual-band Wi-Fi support high-throughput communication.
The energy consumption E of an IoT node can be modeled as:
where Pcpu is dynamic CPU power (scaling with clock frequency), Pradio depends on transmission distance (following the Friis equation), and Pidle represents quiescent power draw from peripherals.
Real-Time Sensor Data Processing
For time-critical applications like industrial monitoring, the Linux kernel's real-time patch (PREEMPT_RT) reduces interrupt latency to sub-millisecond levels. A practical implementation involves:
- Configuring DMA channels for direct sensor-to-memory transfers
- Using hardware PWM timers for precise actuator control
- Implementing a priority-based thread scheduler with SCHED_FIFO policies
The maximum sampling rate fs is constrained by:
where tISR is interrupt service routine latency, tDMA is direct memory access setup time, and tcontext accounts for thread switching overhead.
Secure Device Provisioning
Industrial IoT deployments require hardware-backed security. The Raspberry Pi's HAT EEPROM can store cryptographic keys burned during manufacturing, while the TPM 2.0 overlay implements:
- Remote attestation via Quote/Verify operations
- Secure key generation using the DRBG specified in NIST SP 800-90A
- Tamper-evident logging through PCR extend operations
A zero-trust provisioning flow involves:
# Secure bootloader example
import cryptography.hazmat.primitives.asymmetric.ed25519 as ed25519
from cryptography.hazmat.primitives import serialization

private_key = ed25519.Ed25519PrivateKey.generate()
public_key = private_key.public_key()

with open("/boot/firmware/verify_key.pem", "wb") as f:
   f.write(public_key.public_bytes(
      encoding=serialization.Encoding.PEM,
      format=serialization.PublicFormat.SubjectPublicKeyInfo
   ))
Wireless Protocol Selection
The optimal RF protocol depends on range and power constraints:
| Protocol | Range (m) | Data Rate | Current Draw |
|---|---|---|---|
| LoRaWAN | 5000+ | 0.3-50 kbps | 15 mA @ +20 dBm |
| BLE 5.2 | 100 | 2 Mbps | 8 mA @ 0 dBm |
| Zigbee 3.0 | 100 | 250 kbps | 28 mA @ +3 dBm |
The link budget Lb can be calculated as:
where Ptx is transmit power, Gtx/Grx are antenna gains, Lpath follows the log-distance model, Lfade accounts for multipath effects, and Lsystem includes connector losses.
Time-Series Database Optimization
For high-frequency sensor data, InfluxDB's TSM storage engine outperforms traditional relational databases by:
- Using Gorilla compression for floating-point values (achieving 10:1 compression ratios)
- Implementing adaptive indexing with time-partitioned SSTables
- Supporting continuous queries with push-down predicate evaluation
The compression ratio CR depends on temporal locality:
where H(X) is the entropy of the raw signal and H(Xt|Xt-1) is the conditional entropy between consecutive samples.

5. Common Issues and Fixes
5.1 Common Issues and Fixes
Power Supply Instability
Insufficient or unstable power delivery is a frequent cause of Raspberry Pi malfunctions. The device requires a stable 5V ±5% supply with a minimum current rating of 2.5A under load. Voltage drops below 4.65V trigger CPU throttling, while fluctuations can lead to SD card corruption. To diagnose, measure the 5V rail at the GPIO header (pins 2/4) under load:
where Rtrace represents the PCB trace resistance (~50mΩ for standard Raspberry Pi models). A voltage drop exceeding 350mV indicates an inadequate power source.
SD Card Corruption
The ext4 filesystem used by Raspberry Pi OS is susceptible to corruption during improper shutdowns. Journaling delays in low-end SD cards exacerbate this issue. Mitigation strategies include:
- Using industrial-grade SD cards with power-loss protection
- Implementing read-only filesystems for embedded applications
- Enabling USB boot to eliminate SD card dependency
Thermal Throttling
The BCM2711 SoC in Raspberry Pi 4 begins throttling at 80°C, reducing clock speeds from 1.5GHz to 600MHz. The thermal time constant (τ) governs the temperature rise:
where Rth is the thermal resistance (2.1°C/W for the SoC) and Cth is the thermal capacitance. Active cooling solutions should maintain junction temperatures below 70°C for sustained performance.
Peripheral Interface Issues
Signal integrity problems often manifest in high-speed interfaces (USB 3.0, HDMI 2.0). For I²C and SPI devices, ensure proper termination:
for standard-mode I²C (100kHz). Rise time violations occur when:
Wireless Interference
The Raspberry Pi's integrated Bluetooth/WiFi combomodule (CYW43455) shares antenna resources. Coexistence issues arise when:
- Operating in 2.4GHz crowded spectrums
- Using USB 3.0 peripherals causing RF leakage
Spectrum analysis reveals harmonic interference at integer multiples of 2.4GHz when USB 3.0 operates without proper shielding.
Kernel Panics
Hardware-accelerated tasks (e.g., VideoCore IV operations) may trigger kernel panics if memory allocations exceed the 1GB shared limit. Debug using:
vcgencmd get_mem arm
vcgencmd get_mem gpu
Memory partitioning should maintain at least 128MB for GPU operations in headless configurations.
5.2 Performance Optimization Techniques
Thermal Management and CPU Throttling
Raspberry Pi's System-on-Chip (SoC) dynamically adjusts clock speeds based on thermal conditions. The default thermal throttling threshold is 80°C, reducing CPU frequency to prevent overheating. For sustained high-performance workloads, active cooling (e.g., heatsinks or fans) is essential. The following equation governs the relationship between power dissipation (P), thermal resistance (θJA), and junction temperature (TJ):
where TA is ambient temperature. Overclocking beyond 1.5 GHz requires careful thermal management to avoid violating the SoC's 85°C absolute maximum rating.
Memory and Swap Optimization
The Linux kernel's swappiness parameter (default: 60) controls swap space usage. For memory-intensive applications, reducing swappiness to 10–20 prioritizes RAM utilization:
sudo sysctl vm.swappiness=20ZRAM compression can further improve performance by compressing swap pages in RAM. Enable it via:
sudo apt install zram-toolsFilesystem and I/O Tuning
Ext4 filesystem mount options significantly impact I/O performance. For SD card storage, use noatime, data=writeback, and commit=60 in /etc/fstab:
/dev/mmcblk0p2 / ext4 noatime,data=writeback,commit=60 0 1For USB 3.0-attached SSDs, enable the UAS (USB Attached SCSI) driver and discard (TRIM) support.
GPU Memory Allocation
The default 64MB GPU memory split is insufficient for compute-heavy tasks. Adjust gpu_mem in /boot/config.txt based on workload:
- Machine learning (TensorFlow Lite): 128–256MB
- Video decoding (Kodi): 128MB
- Headless operation: 16MB
Real-Time Kernel Patches
For deterministic latency in control applications, apply the PREEMPT_RT patch. The worst-case latency (Lmax) is bounded by:
where C is worst-case execution time, f is CPU frequency, and D is interrupt dispatch latency. Benchmarks show RT-patched kernels achieve <100μs latency on Raspberry Pi 4.
Power Delivery Analysis
Inadequate power supplies cause voltage droop and instability. The minimum required current Imin for a Raspberry Pi 4 under load is:
Measure actual voltage at the test points (TP1–TP2) using a multimeter. Sustained operation below 4.8V triggers under-voltage warnings.
5.3 Security Best Practices
System Hardening
Raspberry Pi devices, when deployed in networked environments, are susceptible to unauthorized access if not properly hardened. Begin by disabling unnecessary services to minimize attack surfaces. Use the following command to list active services:
systemctl list-unit-files --state=enabledDisable unused services (e.g., Bluetooth, Avahi) via:
sudo systemctl disable bluetooth.service
sudo systemctl disable avahi-daemon.service
Secure Authentication
Replace the default pi user with a custom username and enforce SSH key-based authentication. Disable password authentication in /etc/ssh/sshd_config:
PasswordAuthentication no
ChallengeResponseAuthentication no
For cryptographic key generation, use Ed25519 for optimal security-performance tradeoff:
ssh-keygen -t ed25519 -a 100Network Security
Implement a firewall using ufw (Uncomplicated Firewall) to restrict inbound/outbound traffic. Baseline configuration:
sudo ufw default deny incoming
sudo ufw default allow outgoing
sudo ufw allow from 192.168.1.0/24 to any port 22
sudo ufw enable
For IoT deployments, segment the Pi on a VLAN with MAC address filtering at the switch level.
Filesystem Encryption
For sensitive data storage, use LUKS (Linux Unified Key Setup) encryption. The entropy requirement for key generation is given by:
where H ≥ 256 bits is recommended. Encrypt a partition with:
sudo cryptsetup luksFormat /dev/sdX
sudo cryptsetup open /dev/sdX secure_pi
sudo mkfs.ext4 /dev/mapper/secure_pi
Real-time Monitoring
Deploy an intrusion detection system like AIDE (Advanced Intrusion Detection Environment). Initialize the database:
sudo aideinit
sudo mv /var/lib/aide/aide.db.new /var/lib/aide/aide.db
Configure daily integrity checks via cron:
0 3 * * * /usr/bin/aide --check | mail -s "AIDE Report" admin@domainSecure Boot and Firmware Validation
On Raspberry Pi 4/5 models, enable secure boot by signing the kernel image with a 4096-bit RSA key:
openssl genrsa -out private.pem 4096
openssl req -new -x509 -key private.pem -out public.pem -days 365
sudo mokutil --import public.pem
The bootloader will verify the kernel signature against the TPM module's stored hash:
where M is the kernel image, σ the signature, and (e,N) the public key.
6. Recommended Books and Guides
6.1 Recommended Books and Guides
- Pocket Reference: Raspberry Pi - Apple Books — This is a pocket reference for getting started Raspberry Pi. TOC 1. Introduction to Raspberry Pi 1.1 Raspberry Pi 1.2 Getting Hardware 2. Raspberry Pi Software 2.1 Raspberry Pi Operating System 2.2 Installing Raspberry Pi OS 2.2.1 Setup SD Card 2.2.2 Booting 3. Basic Configuration 3.1…
- Simple Guide to the Raspberry Pi GPIO Header — The Raspberry Pi's GPIO header provides power and General Purpose Input Output pins. The header either has 26 or 40 pins depending on model. ... Home » Hardware » Simple Guide to the Raspberry Pi GPIO Header. Simple Guide to the Raspberry Pi GPIO Header 23. By Matt on June 9, ... I also have a book 'Raspberry Pi Projects for the Evil Genius ...
- Advanced Raspberry Pi: Raspbian Linux and GPIO Integration — Who This Book Is For Advanced Raspberry Pi users who have experience doing basic projects and want to take their projects further. ... The Official Raspberry Pi Beginner's Guide: How to use your new computer ... Paperback. 31 offers from $$1829 $$ 18 29. Raspberry Pi Projects For Dummies.
- Raspberry Pi Pico Workshop for Beginners - Core Electronics — Welcome to the Raspberry Pi Pico Workshop, where you will learn everything you need to know to hit the ground running and start making your own projects with the Raspberry Pi Pico and MicroPython. This workshop is designed for complete beginners and teaches a wide range of related skills through bite-size videos. My name is Jaryd, I'm an engineer and also a passionate maker who loves to teach ...
- Science and Engineering Projects Using the Arduino and Raspberry Pi ... — Paul Bradt has a BS in Computer Science from University of Houston Clear Lake. He currently runs a small company that provides IT support and works as a contractor developing various computer programs. He has worked extensively with microcomputers like Arduino and Pi and believes them to be excellent tools for developing an understanding of how electronic components and hardware interact in ...
- Beginning MicroPython with the Raspberry Pi Pico: Build Electronics and ... — You'll implement example projects with all steps explained, including hardware connections and executing the project. Then apply them to real-world, approachable projects using the accessible Raspberry Pi Pico! The book shows how the cloud is used for IoT data and find out what popular cloud systems currently exist for IoT.
- Freenove Ultimate Starter Kit for Raspberry Pi Pico (Included), Dual ... — Freenove Ultimate Starter Kit for Raspberry Pi Pico (Included), Dual-core Arm Cortex-M0+ Microcontroller, 767-Page Detailed Tutorial, 222 Items, 119 Projects, Python C Java Code : Amazon.ca: Electronics ... Provides step-by-step guide with basic electronics knowledge (The download link can be found on the product box) (No paper tutorial ...
- Raspberry Pi IoT Projects: Prototyping Experiments for Makers — Build your own Internet of Things (IoT) projects for prototyping and proof-of-concept purposes.Updated for the Raspberry Pi 4 and other recent boards, this book contains the tools needed to build a prototype of your design, sense the environment, communicate with the Internet (over the Internet and Machine to Machine communications) and display the results.
- RPi-ESP32 Books - Raspberry Pi Forums — What are you looking for a book on? Raspberry Pi and ESP32 are two totally different things. Yes there are often used together but I doubt there is a single book that covers both. Electronic and Computer Engineer Pi Interests: Home Automation, IOT, Python and Tkinter. ... best regards, Kris. https://www.digitalplayground.be Where fun meets ...
- Explore the Raspberry Pi in 45 Electronics Projects (3rd Edition - Issuu — Please read the rest of this chapter before you go out and buy anything, so you have a good idea of what's best to buy. 1.1 Raspberry Pi You will obviously need a Raspberry Pi.
6.2 Online Resources and Communities
- 13 Raspberry Pi Apps To Power Up Your Raspberry Pi - Technical Ustad — How These Raspberry Pi Apps Form a Dream Team. Raspberry Pi apps shine together. My network has Pi-hole on a Pi Zero blocking ads, Home Assistant and Domoticz on a Pi 4 automating, Nextcloud and OpenMediaVault storing.Kodi and RetroPie rock a Pi 5, MotionEye guards my porch, Node-RED automates, OctoPrint prints, DietPi runs lean, VS Code and Gitea code—all on Raspberry Pi OS.
- Middle School Science/Math Projects - Raspberry Pi Forums — I'm looking for some projects that would align well with Middle School Science or Math. Do you know of some innovative projects with RaspberryPi and the following topics? These are Florida Middle School Unit Topics where I'd like to integrate the Raspberry Pi: Science 6th Grade Science Unit 1: Safety and Practice of Science [SC.6.N.1.1]
- Raspberry Pi Pico Workshop for Beginners - Core Electronics — Welcome to the Raspberry Pi Pico Workshop, where you will learn everything you need to know to hit the ground running and start making your own projects with the Raspberry Pi Pico and MicroPython. This workshop is designed for complete beginners and teaches a wide range of related skills through bite-size videos. My name is Jaryd, I'm an engineer and also a passionate maker who loves to teach ...
- Building a Raspberry Pi robot with the A-Star 32U4 Robot Controller — In this post I will show you how to build an expandable robot platform based on a Raspberry Pi and an A-Star 32U4 Robot Controller.With this platform, the powerful Raspberry Pi can take care of high-level tasks like motion planning, video processing, and network communication, while the A-Star, which mounts to the Pi's GPIO header, takes care of actuator control, sensor inputs, and other low ...
- Connect Synology to NUT server running on Raspberry PI? — I have several devices connected to a NUT server that is running in a Raspberry PI but I am not able to make my Synology NAS connect as I need to change the ups and password. I have 2 Synology NAS: DS414j and DS413j / DSM 6.2.4-25556 Update 6 Under hardware, I have configured UPS to be a Synology UPS server and I have put the IP of the NUT server.
- SunFounder Newton Lab Kit for Raspberry Pi Pico 2 — SunFounder Newton ... — Thank you for choosing the SunFounder Newton Lab Kit!. This advanced learning kit, built around the Raspberry Pi Pico 2, offers a wide range of components, including displays, sound modules, drivers, controllers, and sensors, designed to give you a deep understanding of electronic devices.
- element14 Community — Explore an active electronics engineering community for electronic projects, discussions, and valuable resources, including circuit design, microcontrollers, and Raspberry Pi. Stay informed with the latest electronics news and connect with like-minded enthusiasts.
- CircuitPython 6.2.0 Beta 2 Released! @adafruit @circuitpython — #CircuitPython #Python #micropython @ThePSF @Raspberry_Pi. EYE on NPI - Adafruit Daily — EYE on NPI Maxim's Himalaya uSLIC Step-Down Power Module #EyeOnNPI @maximintegrated @digikey. Adafruit IoT Monthly — The 2024 Recap Issue! Maker Business - Adafruit Daily — Apple to build another chip at TSMC Arizona
- Pi-Apps - Apps List — Raspberry Pi App Store for Open Source Projects. About; ... The tldr project is a collection of community-maintained help pages for command-line tools, that aims to be a simpler, more approachable complement to traditional man pages. ... USBImager is a very useful and minimal app that works like etcher and Raspberry Pi imager but needs less ...
- Lastest Omada version on Raspberry Pi 3B... - Reddit — Home Assistant is open source home automation that puts local control and privacy first. Powered by a worldwide community of tinkerers and DIY enthusiasts. Perfect to run on a Raspberry Pi or a local server. Available for free at home-assistant.io.
6.3 Raspberry Pi Official Documentation
- 9 Amazing Raspberry Pi Apps You Didn't Know Existed — The Raspberry Pi Bootcamp: Understand everything about the Raspberry Pi, stop searching for help all the time, and finally enjoy completing your projects. Master Python on Raspberry Pi: Create, understand, and improve any Python script for your Raspberry Pi. Learn the essentials step-by-step without losing time understanding useless concepts.
- 3.6 Pumping — SunFounder Euler Kit for Raspberry Pi Pico 1.0 documentation — Schematic. In this circuit, you will see that the button is connected to the RUN pin. This is because the motor is operating with too much current, which may cause the Pico to disconnect from the computer, and the button needs to be pressed (for the Pico's RUN pin to receive a low level) to reset.. L293D is a motor driver chip, EN is connected to 5V to make L293D work. 1A and 2A are the ...
- documentation/documentation/asciidoc/computers/raspberry-pi/raspberry ... — The official documentation for Raspberry Pi computers and microcontrollers - raspberrypi/documentation
- [Review] KeDei 3.5" HDMI display with touch for Raspberry Pi — HDMI - allow to connect practically any video source to the display (laptop PC/ Raspberry/Orange/Bana -Pi / BBB / etc) Audio output - stereo 3,5mm jack; Size of Raspberry Pi; XPT2046 touch; MicroUSB for powering display and Pi; No need for propriety drivers (per-compiled kernel) from KeDei; built-in video scaler; Backlight switch
- Getting started with electronics: LEDs and switches using Raspberry Pi — Raspberry Pi Official Magazine issue 152 out now Get to grips with the technology that's going to revolutionise work, life, everything: artificial intelligence. With a stack of Raspberry Pi hardware and our in-depth guide you too can build a machine that (kind of) thinks for itself.
- The Official Raspberry Pi Projects Book Vol 2, 2016 — The Raspberry Pi is the best-selling British computer of all time and is known the world over for making incredible hardware and software projects possible. It's also helping to revolutionise computing education. Learn all about the world's favourite credit card-sized computer in this 200 page book…
- The Official Raspberry Pi Projects Book Vol 3, 2017 — The Raspberry Pi is becoming a household name. It's ubiquitous in the maker community, helped revolutionised computing the world over, and is now the third best-selling computer of all time. Get to know everyone's favourite credit-card sized computer in our latest 200 page projects book!
- The Official Raspberry Pi Beginner's Guide : Gareth Halfacree : Free ... — Set up your Raspberry Pi, install its operating system, and start using this tiny, fully functional computer. Start coding projects, with step-by-step guides using the Scratch and Python programming languages. Experiment with connecting electronic components and have fun creating amazing projects.