


Learn how to use 7-Segment LED Display using Arduino

Description: The 7-segment LED display is a highly useful component, yet it can be quite confusing and challenging for beginners to use. However, it becomes straightforward once it is operational for the first time. The display consists of seven LEDs, with an additional one for the decimal point. Similar to controlling a single LED, each segment LED needs to be connected to a digital pin on an Arduino. The circuit diagram of the LED display shows two different types; however, there is no need for concern as the Common Cathode type is the most prevalent in the market. The essential connections involve linking each LED to a pin and connecting the common ground to the ground pin of the Arduino. Programming is then required to control the LEDs, enabling them to display different numbers. A class has been created for utilizing the 7-segment LED display, providing several basic functions that can be expanded upon or modified to include additional features.
The 7-segment LED display is a crucial component in various electronic applications, particularly in digital clocks, counters, and other numeric displays. Each of the seven segments can be illuminated in different combinations to represent the digits from 0 to 9, as well as some alphabetical characters. The display can be categorized into two types: Common Cathode and Common Anode. In a Common Cathode configuration, the cathodes of all segments are connected to ground, while each segment's anode is connected to an individual control pin. Conversely, in a Common Anode display, all anodes are connected to a positive voltage, and the segments are turned on by connecting their cathodes to ground.
To interface a 7-segment display with an Arduino, each segment must be connected to a digital output pin. For example, segment 'a' can be connected to pin 2, segment 'b' to pin 3, and so on, with the decimal point segment connected to another pin if needed. The ground pin of the display should be connected to the Arduino's ground.
The programming aspect involves defining a function that controls which segments light up to form the desired number. This can be achieved using arrays to map the segment states for each digit. A typical implementation includes a function that takes a digit as input and activates the corresponding segments by setting the appropriate pins HIGH or LOW.
To enhance the functionality, the created class can be expanded with additional methods, such as displaying characters, scrolling numbers, or even handling multiple displays. This modular approach allows for greater flexibility and customization, facilitating the integration of the 7-segment display into various projects.7-Segment LED Display is a very useful component, but also a very confusing and difficult piece to use for beginners. It won`t be difficult once you get it working for the first time. It basically consists of 7 LEDs, (8 if include decimal point). Just like controlling a single LED, we need to connect each segment LED` to a Arduino digital pin. Here is the circuit diagram of the LED display: You might notice, there are 2 different type of them, don`t be scared by them, because in the market, the Common Cathode type is the most popular so you won`t need to care about the other type. Basically, all you need to do is to connect each LED with a pin, and connect the shared Gnd connector to the ground pin.
Next you will need to program it, sorequired LEDs are switched on todisplay different number. I have created a class for using the 7 seg LED display, it`s not a complete working class, but gives a few very useful basic functions. Feel free to expand it and add new useful functions, or create your own class.
The 7-segment LED display is a crucial component in various electronic applications, particularly in digital clocks, counters, and other numeric displays. Each of the seven segments can be illuminated in different combinations to represent the digits from 0 to 9, as well as some alphabetical characters. The display can be categorized into two types: Common Cathode and Common Anode. In a Common Cathode configuration, the cathodes of all segments are connected to ground, while each segment's anode is connected to an individual control pin. Conversely, in a Common Anode display, all anodes are connected to a positive voltage, and the segments are turned on by connecting their cathodes to ground.
To interface a 7-segment display with an Arduino, each segment must be connected to a digital output pin. For example, segment 'a' can be connected to pin 2, segment 'b' to pin 3, and so on, with the decimal point segment connected to another pin if needed. The ground pin of the display should be connected to the Arduino's ground.
The programming aspect involves defining a function that controls which segments light up to form the desired number. This can be achieved using arrays to map the segment states for each digit. A typical implementation includes a function that takes a digit as input and activates the corresponding segments by setting the appropriate pins HIGH or LOW.
To enhance the functionality, the created class can be expanded with additional methods, such as displaying characters, scrolling numbers, or even handling multiple displays. This modular approach allows for greater flexibility and customization, facilitating the integration of the 7-segment display into various projects.7-Segment LED Display is a very useful component, but also a very confusing and difficult piece to use for beginners. It won`t be difficult once you get it working for the first time. It basically consists of 7 LEDs, (8 if include decimal point). Just like controlling a single LED, we need to connect each segment LED` to a Arduino digital pin. Here is the circuit diagram of the LED display: You might notice, there are 2 different type of them, don`t be scared by them, because in the market, the Common Cathode type is the most popular so you won`t need to care about the other type. Basically, all you need to do is to connect each LED with a pin, and connect the shared Gnd connector to the ground pin.
Next you will need to program it, sorequired LEDs are switched on todisplay different number. I have created a class for using the 7 seg LED display, it`s not a complete working class, but gives a few very useful basic functions. Feel free to expand it and add new useful functions, or create your own class.

instrumentation amplifier How to Read Wheatstone Bridge negative voltage with Arduino
A half-bridge setup is utilized with strain gauges and an INA126 to amplify the voltage. The voltage can be read accurately when the lever is bent in one direction; however, no reading is obtained when the lever is bent in...

Xbee doorbell project
When the start button is pressed, the Arduino selects a random 4-digit code and flashes lights to indicate the code. If the user successfully repeats the code using the other buttons, the XBee module sends a message to another XBee...
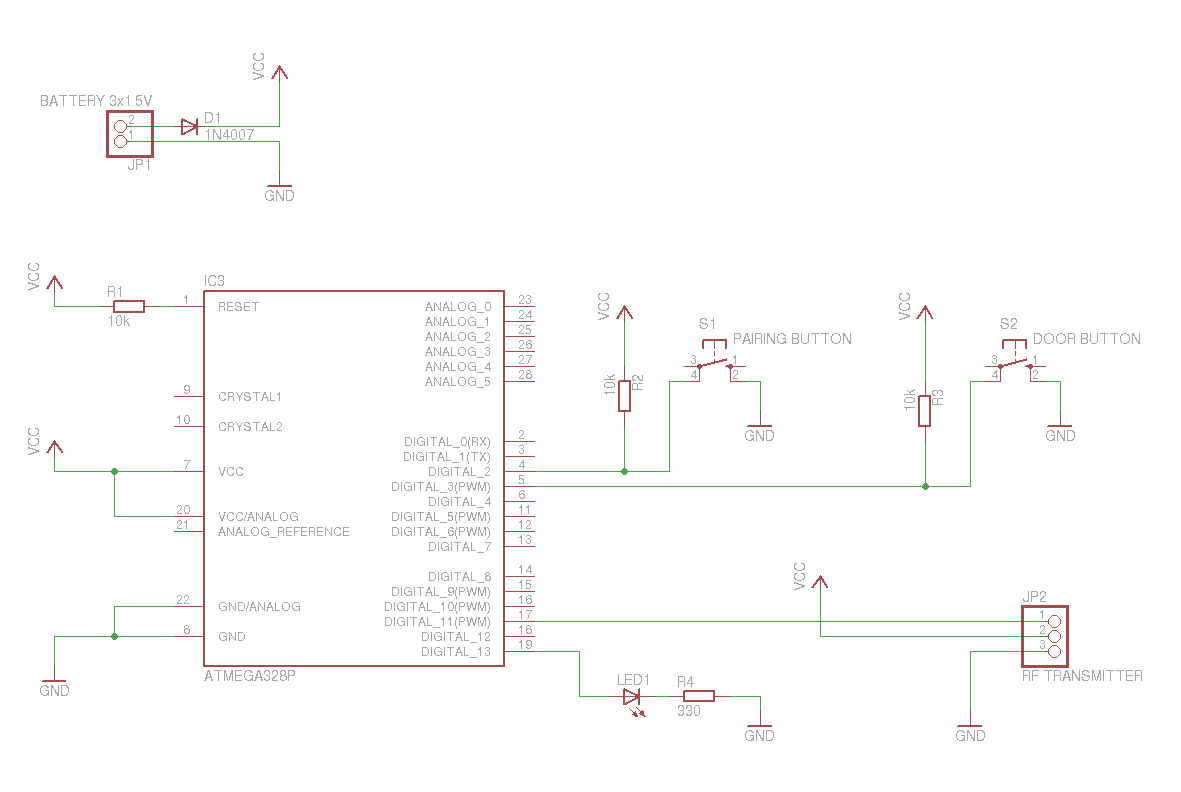
arduino based remote control for electric door
A replacement remote control system for an electric garage door was constructed after the original remote failed multiple times. Although the old remote could have been repaired, it was 35 years old and not particularly enjoyable to use.
The replacement...

Custom Arduino circuit not working
A circuit utilizes a keypad, a servo, and several LEDs, connected to an Arduino Uno. The objective was to integrate all components onto a single PCB, effectively creating a custom version of the Arduino. Upon startup, the red LED is...

7-Segment (Led) Display Driver Circuit
An IC1, such as the 7447, drives a common anode 7-segment LED display. The current-limiting resistor R must restrict the segment current to the rated value at the maximum supply voltage. A sample calculation is provided.
The 7447 integrated circuit is...
.jpg "Arduino Clock Based on PCF8563 circuit")
Arduino Clock Based on PCF8563
This tutorial demonstrates how to utilize an Arduino to display the current time and date on an optional LCD screen and in the Arduino IDE serial monitor. A PCF8563 real-time clock (RTC) integrated circuit (IC) is employed to provide accurate...

Robot shield for Arduino
The objective of this project is to consolidate various robot designs and transform them into a new device featuring updated hardware and standardized software, specifically utilizing Arduino for ease of use. These robots share three key components: a mechanical structure,...

Arduino Power
Controlling higher-power devices such as lights, motors, pumps, and doors with an Arduino can be both fascinating and practical. However, managing power line voltages presents challenges and potential hazards. There are essential differences between controlling AC and DC power, as...

Arduino Actuators
Agy utilized the Lilypad Arduino and LEDs for the first time in a textile project called Blinky Bike Bag, merging her skills in fabric manipulation with electronics. The bike bag is constructed from umbrella material to ensure waterproofing and incorporates...