


Hot Springs Reverb
#reverb
#audio effects
#patch panel
#mixer
#electro-magnetic fields
#input jacks
#output jacks
#console
#total mix

Description: The Hot Springs tanks and circuit board should be mounted in a location that is free of ambient electro-magnetic fields. The input and output jacks are typically placed on a patch panel with other effects inputs and outputs. In use, the effects or aux send bus of the console patches to the Hot Springs input and the output of the Hot Springs returns to one of the mixer inputs for control of reverb level in the total mix. More: Use a Y cord or splitter to send the instrument signal to both channel one of your amp and the Hot Springs input. Then patch the Hot Springs output to channel two of the amp. Adjust the amount of reverb with channel two's volume control and adjust.
The circuit design for the Hot Springs system incorporates a reverb tank and a dedicated circuit board, which requires careful placement to minimize interference from ambient electromagnetic fields. This is crucial for maintaining signal integrity and ensuring optimal performance. The input and output jacks are mounted on a patch panel, allowing for easy integration with other effects devices.
To connect the Hot Springs to a mixing console, the effects or auxiliary send bus is utilized. The signal from the console is routed to the input of the Hot Springs, where it undergoes processing through the reverb tank. The processed signal is then returned to the mixer through one of its input channels, enabling the operator to control the reverb level within the overall mix.
For optimal signal routing, a Y cord or splitter is recommended. This configuration allows the instrument signal to be sent simultaneously to both channel one of the amplifier and the Hot Springs input. The output from the Hot Springs is then routed to channel two of the amplifier. This setup permits independent control of the reverb effect through the volume control of channel two, allowing for precise adjustments to the reverb level while maintaining the original instrument signal on channel one.
In summary, the Hot Springs system's design emphasizes ease of integration with existing audio equipment, allowing for versatile reverb effects management while ensuring minimal interference and optimal audio quality.The Hot Springs tanks and circuit board should be mounted in a location that is free of ambient electro-magnetic fields. The input and output jacks are typically placed on a patch panel with other effect`s inputs and outputs.
In use, the effects or aux send buss of the console patches to the Hot Springs input and the output of the Hot Springs returns to one of the mixer inputs for control of reverb level in the total mix.h Use a Y cord or splitter to send the instrument signal to both channel one of your amp and the Hot Springs input. Then patch the Hot Spring`s output to channel two of the amp. Adjust the amoung of reverb with channel two`s volume control and adj
The circuit design for the Hot Springs system incorporates a reverb tank and a dedicated circuit board, which requires careful placement to minimize interference from ambient electromagnetic fields. This is crucial for maintaining signal integrity and ensuring optimal performance. The input and output jacks are mounted on a patch panel, allowing for easy integration with other effects devices.
To connect the Hot Springs to a mixing console, the effects or auxiliary send bus is utilized. The signal from the console is routed to the input of the Hot Springs, where it undergoes processing through the reverb tank. The processed signal is then returned to the mixer through one of its input channels, enabling the operator to control the reverb level within the overall mix.
For optimal signal routing, a Y cord or splitter is recommended. This configuration allows the instrument signal to be sent simultaneously to both channel one of the amplifier and the Hot Springs input. The output from the Hot Springs is then routed to channel two of the amplifier. This setup permits independent control of the reverb effect through the volume control of channel two, allowing for precise adjustments to the reverb level while maintaining the original instrument signal on channel one.
In summary, the Hot Springs system's design emphasizes ease of integration with existing audio equipment, allowing for versatile reverb effects management while ensuring minimal interference and optimal audio quality.The Hot Springs tanks and circuit board should be mounted in a location that is free of ambient electro-magnetic fields. The input and output jacks are typically placed on a patch panel with other effect`s inputs and outputs.
In use, the effects or aux send buss of the console patches to the Hot Springs input and the output of the Hot Springs returns to one of the mixer inputs for control of reverb level in the total mix.h Use a Y cord or splitter to send the instrument signal to both channel one of your amp and the Hot Springs input. Then patch the Hot Spring`s output to channel two of the amp. Adjust the amoung of reverb with channel two`s volume control and adj

Micro mixer circuit by TA7137
A micro mixer circuit is designed to be simple, affordable, compact, and versatile. This circuit can mix up to four input channels, including microphone signals, FM tuners, AUX, and other signals, as illustrated in Figure 1. The operation begins with...

THREE INPUT TWO OUTPUT MIXER
Utilizes two distinct common-cathode video mixers. Identical heading markers are inserted into the front input 2 of both mixers, while the other inputs manage independent markers.
The circuit employs two common-cathode video mixers, which are integral components for combining multiple video...
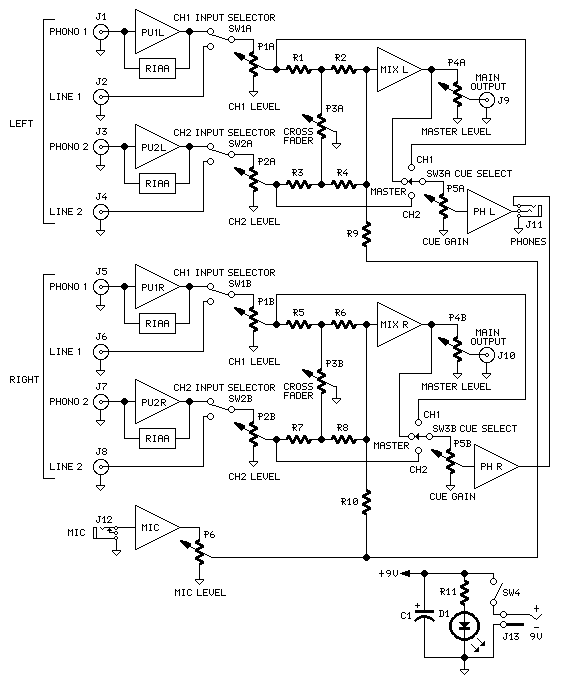
Compact DJ Station
The mixer features two stereo phono inputs and two stereo line-level inputs, along with one stereo bonded channel. Additionally, it includes a microphone input and a stereo output with adjustable gain.
The mixer is designed to facilitate audio mixing and processing...

Custom DJ Karaoke Mixer/Scratch Pad/Laptop
After careful consideration and review of feedback, adjustments have been made to the project plans to include or remove certain functions. This project has already accumulated several developments.
The project in question appears to involve a systematic approach to electronic design,...
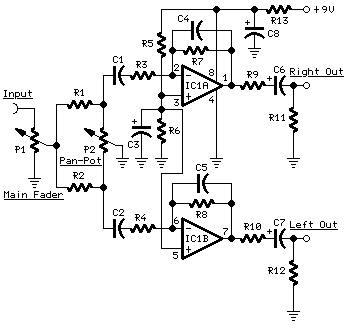
Hi Fi mini mixer
Input Amplifier Module: a low noise circuit equipped with a variable voltage-gain (10 - 100) pre-set, primarily intended as high quality microphone input, also suitable for low-level line input. High-quality modular design. 9V Battery powered - Very low current drawing....

The Mixer Pre MIC 3 channel by LM348-741G—4
For those seeking a mixer with a microphone, this circuit is highly recommended for easy assembly.
The proposed circuit is designed to serve as a microphone mixer, allowing users to blend audio signals from multiple microphones into a single output. This...

mixer
This design features a straightforward configuration that is effective and cost-efficient to construct. It consists of six independent microphone amplifiers capable of providing up to 60dB gain (theoretical, not tested). Each channel is equipped with its own fader and attenuator,...
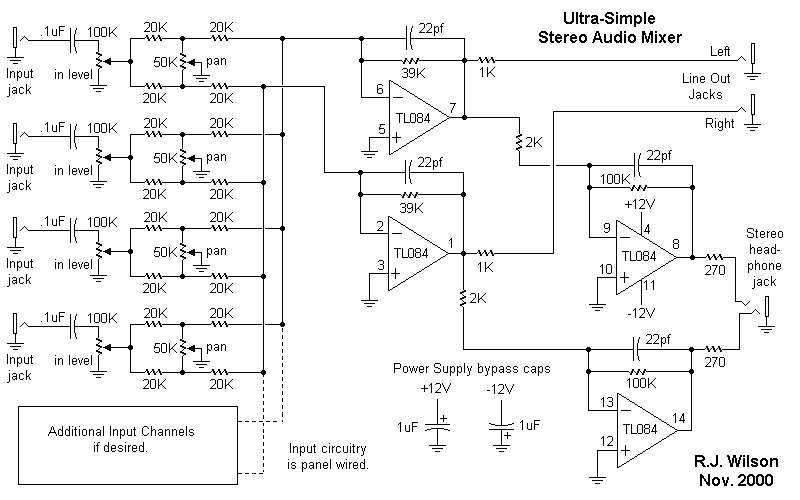
Ultra-Simple Mono-in Panning Mixer
This project represents an older design that has likely been replaced by a more recent version. Nonetheless, it remains a practical design suitable for a home-brew synthesizer. It is important to note that many of these designs lack circuit descriptions,...

mixer and vu meter
The 10k resistors in question are R15, R17, R18, and R19 (R16 is located elsewhere). Their purpose is to isolate the input channels; otherwise, turning the volume control for one channel down to zero would also connect the output signal...