


Sound-Activated Lamp circuit diagram (Relay/Switch)
#sound-activated
#relay
#switch
#audio amplifier
#microphone
#LED
#disco light
#sensitivity adjustment
#automotive lighting
#home automation

Description: This simple circuit illustrated in the schematic diagram activates the switch using sound. It can be utilized for various applications, such as automatic (sound-controlled) disco lights or car LED light shows. The transistor Q1 amplifies the audio from the microphone. The resistor R1 is employed to adjust the peak of the signal to greater than approximately 0.7 volts, functioning as a sensitivity adjuster.
The circuit operates by detecting sound levels through a microphone, which converts sound waves into an electrical signal. The microphone's output is typically a low-level audio signal, which is insufficient to drive most electronic components directly. Therefore, Q1, a transistor, is employed as an amplifier to boost this signal.
When sound is detected, the microphone generates a corresponding electrical signal that is fed into the base of the transistor Q1. The transistor is configured in a common-emitter configuration, which provides significant voltage gain. The amplified output from the collector of Q1 can then be used to drive a relay or another switching device, allowing for control of larger loads such as lights or sound systems.
The resistor R1 plays a critical role in setting the threshold for activation. By adjusting R1, the user can fine-tune the circuit's sensitivity to sound, ensuring that it only activates in response to desired sound levels. If the signal at the base of Q1 exceeds approximately 0.7 volts, the transistor will enter saturation, allowing current to flow from the collector to the emitter, thus activating the connected load.
Additional components may be included in the circuit for enhanced functionality. For instance, a capacitor could be added in parallel with R1 to filter out high-frequency noise, ensuring that only significant sound events trigger the circuit. A diode might also be incorporated to protect the circuit from back EMF generated when using inductive loads like relays.
This sound-activated switch circuit is versatile and can be adapted for various applications, including sound-activated decorations, automatic lighting systems, and interactive displays, making it a useful tool in both hobbyist and professional electronic projects.This simple circuit shown int the schematic diagram actives the switch using sound. We can use this circuit for various applications, such as automatic (sound-controlled) disco light or car s LED light show. The Q1 amplify the audio from mic. The R1 is used to adjust the peak of signal to greater than about 0.7 volts, act as sensitivity adjuster.
A certain l..
The circuit operates by detecting sound levels through a microphone, which converts sound waves into an electrical signal. The microphone's output is typically a low-level audio signal, which is insufficient to drive most electronic components directly. Therefore, Q1, a transistor, is employed as an amplifier to boost this signal.
When sound is detected, the microphone generates a corresponding electrical signal that is fed into the base of the transistor Q1. The transistor is configured in a common-emitter configuration, which provides significant voltage gain. The amplified output from the collector of Q1 can then be used to drive a relay or another switching device, allowing for control of larger loads such as lights or sound systems.
The resistor R1 plays a critical role in setting the threshold for activation. By adjusting R1, the user can fine-tune the circuit's sensitivity to sound, ensuring that it only activates in response to desired sound levels. If the signal at the base of Q1 exceeds approximately 0.7 volts, the transistor will enter saturation, allowing current to flow from the collector to the emitter, thus activating the connected load.
Additional components may be included in the circuit for enhanced functionality. For instance, a capacitor could be added in parallel with R1 to filter out high-frequency noise, ensuring that only significant sound events trigger the circuit. A diode might also be incorporated to protect the circuit from back EMF generated when using inductive loads like relays.
This sound-activated switch circuit is versatile and can be adapted for various applications, including sound-activated decorations, automatic lighting systems, and interactive displays, making it a useful tool in both hobbyist and professional electronic projects.This simple circuit shown int the schematic diagram actives the switch using sound. We can use this circuit for various applications, such as automatic (sound-controlled) disco light or car s LED light show. The Q1 amplify the audio from mic. The R1 is used to adjust the peak of signal to greater than about 0.7 volts, act as sensitivity adjuster.
A certain l..

10 led VU Meter using LM3915
The circuit diagram represents a straightforward circuit-level indication featuring 10 LEDs. It utilizes a series of half-wave rectification controlled by the precision operational amplifier IC2 TL071. The LM3915 integrated circuit is employed to manage the LEDs, functioning as a VU...

LEDs or lamps sequencer circuit
A voltage supply ranging from 6 V to 15 V is required when using a single LED per module. An increase in the number of LEDs necessitates a corresponding increase in the voltage supply, with additional LEDs connected in series....
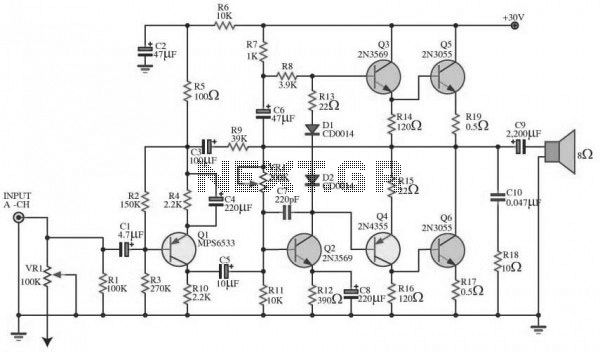
Audio Amplifier Diagram
The circuit is based on four integrated circuits: TL072, TL074, MN3101, and MN3004, which produce four output channels for surround audio, specifically targeting center, rear, front right, and front left audio. It is a compact amplifier capable of delivering 7W...
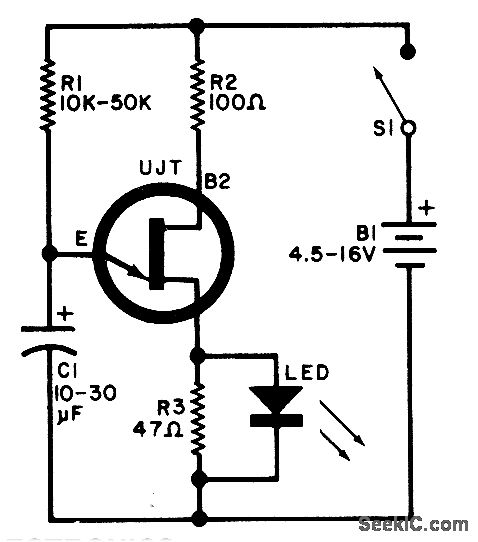
LED FLASHER USES UJT
A relaxation oscillator is employed to flash an LED in the base circuit. Capacitor C1 is charged gradually through resistor R1 by the power supply and is then discharged intermittently through resistor R3 and the LED by the Unijunction Transistor...

LM3876 - High-Performance 56W Audio Power Amplifier with Mute
The air-cored inductor L1 is constructed using 13 turns of 1mm diameter enamelled copper wire, featuring an inner diameter of 10mm. The completed inductor is positioned over R7, with its terminals soldered to those of the resistor. All electrolytic capacitors...

LED effects with ATTYNI2313
This project I made for my little daughter. It is 24 channel light illumination. The schematic is very simple 24 LEDs, 1 MCU and some additional components. The main principle is dynamic indication, which is usually implemented for control of...
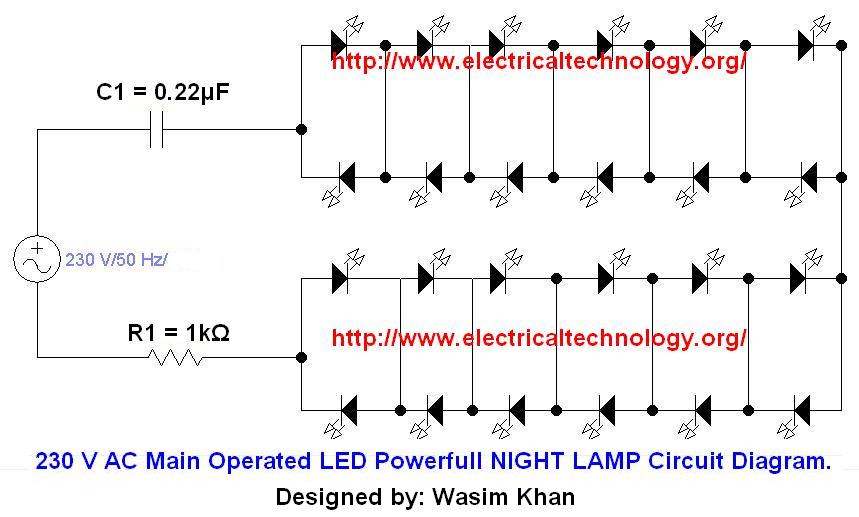
230 V 50Hz AC (or 110V 60Hz) Main Operated LED Powerful NIGHT LAMPCircuit
If you plan to use this circuit with a 110V 60Hz supply instead of a 230V 50Hz supply, or if you intend to modify this circuit, please refer to the section titled "Common Questions about this Circuit" found below the...
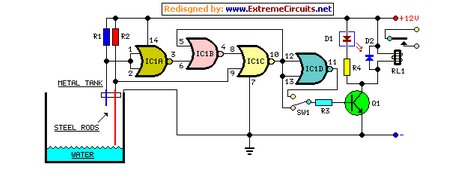
Water Pump Relay Controller Circuit Schematic
This circuit utilizes a relay to control a water pump for automatic level regulation of a water reservoir or well. The shorter steel rod acts as a high water sensor, while the longer rod serves as a low water sensor....

Cheap led christmas light flasher circuit is controlled by audio
Individuals seeking a distinctive gift for Christmas and New Year may find this project appealing. Certification of this project will undoubtedly create a preference for it.
The project in question appears to be a creative endeavor aimed at providing a unique...