


Simple LED blinking using PIC16F877A
#PIC16F877A
#LED
#blinking
#microcontroller
#embedded
#programming
#electronics
#DIY
#tutorial
#beginner

Description: This project involves a basic LED blinking circuit utilizing the PIC16F877A microcontroller. It features two LEDs connected to the PIC16F877A, with the source code adapted from the 16F template.
The circuit design consists of the PIC16F877A microcontroller, which serves as the central control unit for the LED blinking operation. The two LEDs are connected to specific GPIO (General Purpose Input/Output) pins of the microcontroller, allowing for individual control of each LED. A resistor is typically placed in series with each LED to limit the current and prevent damage to the LEDs.
The operation of the circuit is governed by a simple program written in assembly or C, which is uploaded to the microcontroller. The source code is derived from the existing 16F template, which provides a framework for initializing the microcontroller and configuring the GPIO pins. The code includes a loop that toggles the state of each LED at defined intervals, creating a blinking effect.
For power supply, the circuit can be powered using a standard voltage source compatible with the PIC16F877A, usually 5V. Proper decoupling capacitors should be placed near the power pins of the microcontroller to ensure stable operation.
This simple LED blinking project serves as an introductory exercise in embedded programming and microcontroller interfacing, demonstrating fundamental concepts such as GPIO control, timing, and basic circuit design. The versatility of the PIC16F877A allows for further expansion of the project, such as adding more LEDs, incorporating sensors, or implementing user input mechanisms for enhanced functionality.This is a simple LED blinking project using PIC16F877A. Basically there are only 2 LEDs, connected to PIC16F877A and the source code is being modified from the 16F template..
The circuit design consists of the PIC16F877A microcontroller, which serves as the central control unit for the LED blinking operation. The two LEDs are connected to specific GPIO (General Purpose Input/Output) pins of the microcontroller, allowing for individual control of each LED. A resistor is typically placed in series with each LED to limit the current and prevent damage to the LEDs.
The operation of the circuit is governed by a simple program written in assembly or C, which is uploaded to the microcontroller. The source code is derived from the existing 16F template, which provides a framework for initializing the microcontroller and configuring the GPIO pins. The code includes a loop that toggles the state of each LED at defined intervals, creating a blinking effect.
For power supply, the circuit can be powered using a standard voltage source compatible with the PIC16F877A, usually 5V. Proper decoupling capacitors should be placed near the power pins of the microcontroller to ensure stable operation.
This simple LED blinking project serves as an introductory exercise in embedded programming and microcontroller interfacing, demonstrating fundamental concepts such as GPIO control, timing, and basic circuit design. The versatility of the PIC16F877A allows for further expansion of the project, such as adding more LEDs, incorporating sensors, or implementing user input mechanisms for enhanced functionality.This is a simple LED blinking project using PIC16F877A. Basically there are only 2 LEDs, connected to PIC16F877A and the source code is being modified from the 16F template..

Easy 1.5 V LED flasher
This simple flash is very compact to build in such a brooch. I have the circuit extracted from a CD cover. The flash uses a 1.5 V supply, this is a penlight or a button cell to use. Capacitor C1...

Mains Operated LED Circuit
This is a straightforward and effective LED circuit that can be powered directly from an AC mains supply ranging from 100 volts to 230 volts. The circuit can serve as a mains power indicator or a night lamp. Resistors R1...

LEDs or lamps sequencer circuit
A voltage supply ranging from 6 V to 15 V is required when using a single LED per module. An increase in the number of LEDs necessitates a corresponding increase in the voltage supply, with additional LEDs connected in series....

Microcontroller measures heart rate through fingertip
The reflected infrared (IR) signal detected by the photodiode is sent to a signal conditioning circuit, which filters out unwanted signals and amplifies the desired output.
The circuit begins with a photodiode that captures the reflected IR signals. The photodiode operates...
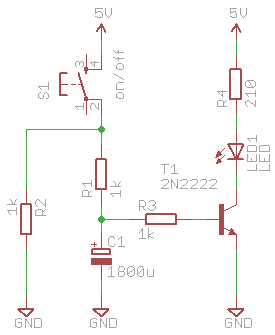
led fade in fade out
A small project in the second scene focuses on smoothly fading an LED in and out without using a microcontroller. Some modifications were made, including separating the transistors and changing the quality of the resistors. This is intended to reduce...

switch mode power supply design of current load sense circuit
A suitable method to sense when some LEDs in a garage door opener are illuminated. A power source, potentially the same as Vout, connects to a 1.5 kΩ resistor, which then connects to six LEDs followed by a transistor. This...

LED Dimmer Lighting
A dimmer for individual LED bulbs. LEDs (light emitting diodes) are very sensitive components; exceeding their rated current or voltage can drastically reduce their lifespan from over 50,000 hours to mere microseconds. LEDs are current-driven, meaning that the intensity of...
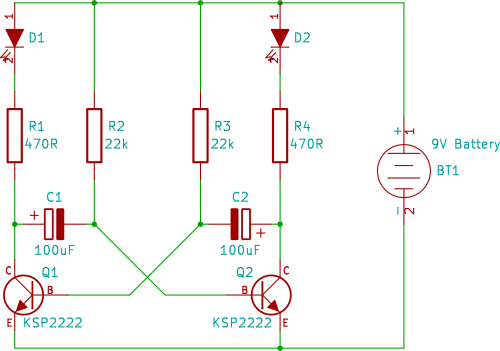
dual LED flasher
A two-transistor circuit that alternately flashes two LEDs on and off. This tutorial demonstrates how beginners in electronics can build this simple circuit on a breadboard.
This circuit utilizes two NPN transistors configured in a flip-flop arrangement, which allows for the...

Basic circuit for PIC16F877A
To operate a microcontroller, basic components are required to support its functionality, which is referred to as a basic circuit. The components needed are common and readily available at any electronics store. This document presents the schematic of a basic...